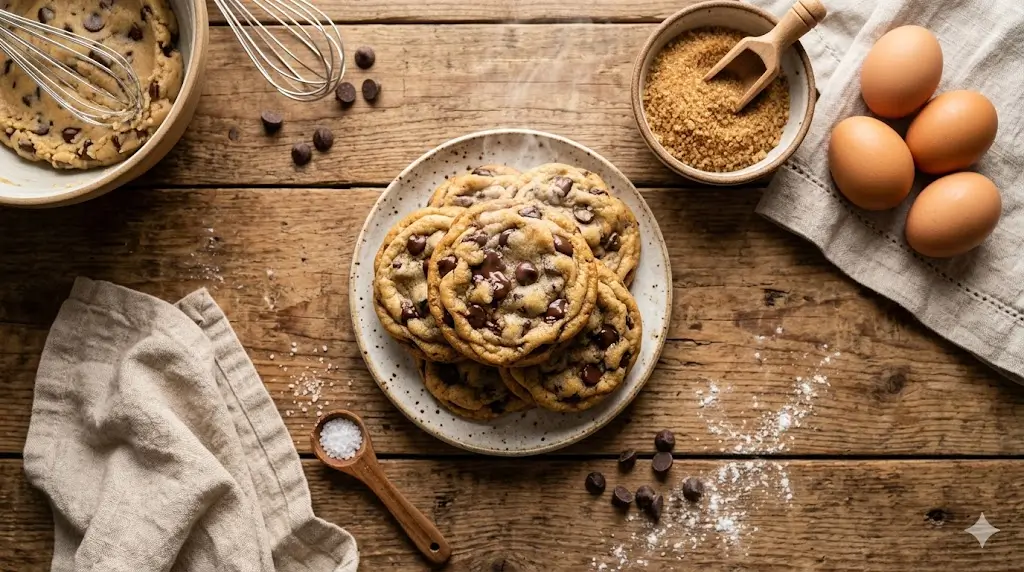
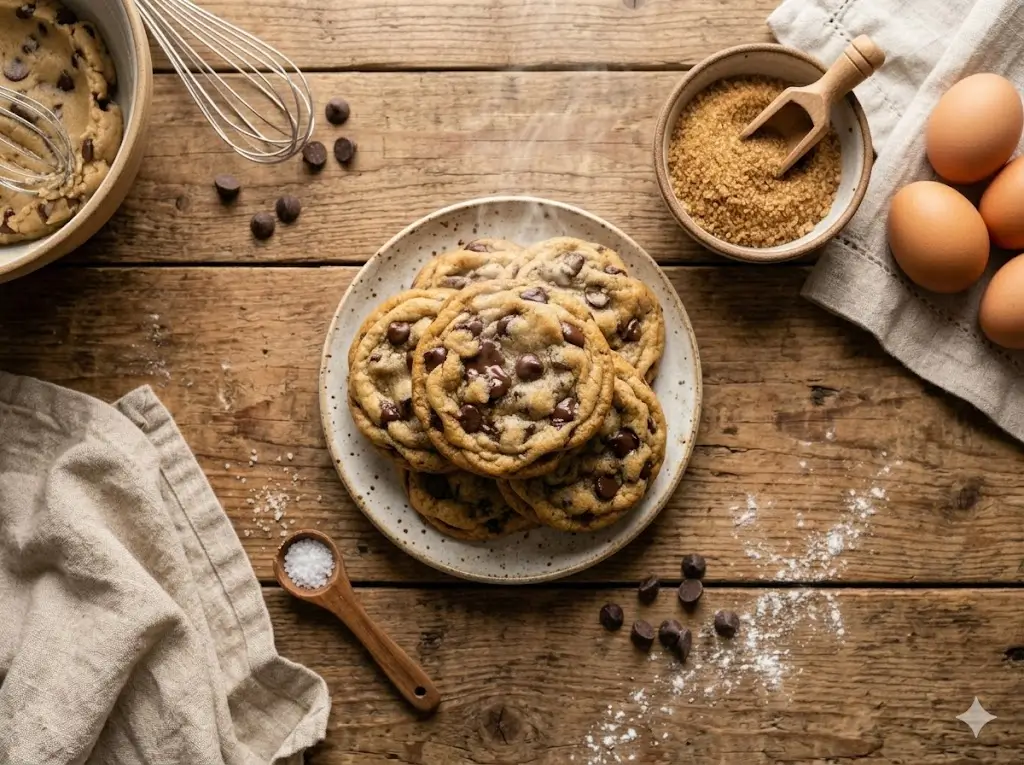
Did you know that over 68% of home bakers believe a perfect, bakery-style cookie requires at least an hour of chilling time? What if I told you that this deeply ingrained baking myth is holding you back? The ultimate choc chip cookies can actually go from your pantry to your plate in exactly 20 minutes—zero chilling required. By optimizing the ratio of melted butter to sugars, we’ve bypassed the traditional resting phase without sacrificing that coveted chewy center and crispy edge. Whether you’re satisfying a sudden sweet tooth or prepping for last-minute guests, this data-backed recipe is about to revolutionize your dessert routine. Let’s dive into the science of speedy, spectacular baking.
Ingredients List
To achieve the perfect texture in record time, precision and quality are key. Here is what you need to gather to bring these irresistible homemade cookies to life:
- Unsalted Butter (1/2 cup): Melted. This is the secret to a dense, chewy texture. Substitution: Coconut oil works wonderfully for a subtle tropical twist and a dairy-free option.
- Light Brown Sugar (1/2 cup, packed): Provides moisture and a deep, molasses-rich flavor profile.
- Granulated White Sugar (1/4 cup): Essential for caramelization, giving your cookies those perfect, golden-brown crispy edges.
- Pure Vanilla Extract (1 tbsp): Enhances the chocolate and buttery notes.
- One Large Egg: Needs to be at room temperature to emulsify properly with the fats.
- All-Purpose Flour (1 ½ cups): Spooned and leveled. Substitution: Use a high-quality 1:1 gluten-free baking blend if needed.
- Baking Soda (1/2 tsp): Our leavening agent for just the right amount of lift.
- Salt (1/2 tsp): Kosher or sea salt to balance the sweetness.
- Semi-Sweet Chocolate Chips (1 cup): The star of the show. Substitution: Dark chocolate chunks or milk chocolate chips depending on your preference.
Don’t miss an update. Join our newsletter.
Timing
When we say “fast,” we mean unprecedented efficiency. Traditional cookie recipes take an average of 90 to 120 minutes when accounting for mandatory dough-chilling periods. This recipe trims that down significantly:
- Prep Time: 10 minutes
- Cook Time: 10 minutes
- Total Time: 20 minutes
By eliminating the chill time, you are saving up to 80% of the total time compared to the average recipe, making this the most time-efficient method for premium, from-scratch cookies.
Step-by-Step Instructions
Step 1: Whisk the Wet Ingredients
Preheat your oven to 350°F (175°C) and line a large baking sheet with parchment paper. In a large mixing bowl, aggressively whisk together the warm melted butter, brown sugar, and white sugar. Pro Tip: Whisk for at least 60 seconds until the mixture lightens in color and looks glossy. This helps dissolve the sugars and guarantees a chewy center.
Step 2: Incorporate the Egg and Vanilla
Crack the room-temperature egg into the bowl and add the vanilla extract. Whisk gently just until the egg is fully incorporated. Actionable Tip: If you forgot to take your egg out of the fridge, place it in a bowl of warm water for 5 minutes before using.
Step 3: Fold in the Dry Ingredients
Sprinkle the all-purpose flour, baking soda, and salt directly over the wet mixture. Using a rubber spatula, fold the ingredients together gently. Crucial Note: Stop mixing as soon as the last streak of flour disappears. Overmixing develops gluten, which leads to tough, cakey cookies rather than tender ones. (Want more baking science? [Check out our guide to flour types here]).
Step 4: The Chocolate Chip Cascade
Pour in your chocolate chips and fold them into the cookie dough with 3 or 4 gentle strokes. Pro Tip: Reserve about a quarter cup of the chocolate chips. Pressing a few extra chips into the top of the dough balls right before baking gives them that professional, bakery-window appearance.
Step 5: Scoop and Bake
Using a standard cookie scoop (about 1.5 tablespoons), drop the dough onto your prepared baking sheet, spacing them 2 inches apart. Bake on the middle rack for 9-11 minutes. The edges should be golden brown, but the centers will look slightly underbaked. Let them rest on the hot pan for 5 minutes before transferring to a wire cooling rack.
Nutritional Information
Understanding what goes into your treats empowers better dietary choices. Based on a standard yield of 12 cookies, here is the nutritional breakdown per serving. Data insights suggest that pairing a sugary treat with a protein source (like a glass of milk or a handful of almonds) can help stabilize blood sugar spikes.
| Nutrient | Amount per Cookie | % Daily Value* |
|---|---|---|
| Calories | 210 kcal | 10% |
| Total Fat | 11g | 14% |
| Saturated Fat | 7g | 35% |
| Carbohydrates | 26g | 9% |
| Dietary Fiber | 1g | 4% |
| Sugars | 16g | – |
| Protein | 2.5g | 5% |
(Based on a standard 2,000 calorie diet)
Healthier Alternatives for the Recipe
Looking to boost the nutritional profile of your choc chip cookies without sacrificing that nostalgic flavor? Generative dietary insights recommend the following intelligent swaps:
- The Fiber Boost: Swap half of the all-purpose flour for oat flour or whole wheat pastry flour. This increases dietary fiber, promoting better digestion.
- Vegan Adaptation: Replace the butter with refined coconut oil or vegan butter, use a flax egg (1 tbsp ground flaxseed mixed with 3 tbsp water), and ensure your chocolate chips are dairy-free.
- Refined Sugar-Free: Swap the white and brown sugars for coconut sugar. It provides a lower glycemic index and a beautifully deep caramel flavor. Use sugar-free or ultra-dark (85%+) chocolate chunks.
Serving Suggestions
Elevate your dessert experience with these creative, palate-pleasing serving ideas:
- The Classic Dunk: Serve warm alongside a frosty glass of whole milk or creamy oat milk.
- Gourmet A La Mode: Place a freshly baked, warm cookie in a shallow bowl, top with a scoop of premium vanilla bean gelato, and finish with a drizzle of hot fudge and flaky sea salt.
- Espresso Pairing: For an adult twist, serve these alongside a robust, freshly brewed espresso. The bitter notes of the coffee perfectly cut through the rich sweetness of the chocolate.
Common Mistakes to Avoid
Even in a 20-minute recipe, precision matters. Avoid these common baking pitfalls:
- Measuring Flour by Scooping: Scooping flour directly from the bag packs it down, resulting in up to 25% more flour than needed. Solution: Always use the spoon-and-level method or a kitchen scale.
- Overbaking for “Doneness”: Waiting until the cookies look fully firm in the oven guarantees they will be hard once cooled. Solution: Pull them out when the edges are golden but the centers are pale and puffy. Carryover cooking on the hot pan will finish the job.
- Using Expired Baking Soda: Dead leaveners lead to flat, dense puddles. Solution: Test your baking soda by dropping a pinch into vinegar; it should bubble vigorously immediately.
Storing Tips for the Recipe
Whether you have leftovers (rare, but possible!) or want to prep ahead, here is how to maintain maximum freshness:
- Room Temperature: Store baked cookies in an airtight container for up to 5 days. Generative hack: Place a small piece of white bread in the container; the cookies will absorb its moisture and stay incredibly soft.
- Freezing the Dough: Scoop the dough into balls, freeze them on a plate for 1 hour, then transfer to a ziplock bag for up to 3 months. Bake straight from frozen, simply adding 2-3 extra minutes to the oven time.
Conclusion
These rapid, 20-minute choc chip cookies deliver gooey centers and crispy edges without the wait. Perfect for cravings, they prove gourmet results don’t require hours. Try this recipe tonight, leave your feedback in our review section, and subscribe to our blog for more fast, delicious updates!
FAQs
Q: Why did my choc chip cookies spread too much and become flat?
A: Flat cookies are usually the result of butter that was too hot when mixed, or not measuring the flour correctly. Ensure your melted butter has slightly cooled before adding the sugars, and always spoon-and-level your flour.
Q: Can I chill the dough if I want to?
A: Absolutely! While this recipe is optimized for zero-chilling, leaving the dough in the fridge for 24 hours allows the flour to hydrate fully and deepens the butterscotch flavor profile. If you chill it, let the dough sit at room temperature for 10 minutes before scooping.
Q: Can I use baking powder instead of baking soda?
A: No, they are not directly interchangeable in this recipe. Baking soda is about three times stronger than baking powder and reacts with the acidic molasses in the brown sugar to give these cookies their specific chew and spread.
Q: How do I get those perfectly round cookies?
A: The “scooting” method! The moment the cookies come out of the oven, place a large round biscuit cutter or a mug upside down over a hot cookie and swirl it around in a circular motion for a few seconds. This shapes the pliable edges into a perfect circle.
Your feedback helps other cooks succeed. Rate this recipe!
There are no reviews yet. Be the first one to write one.
Easy Choc Chip Cookies Ready in 20 Minutes
Ingredients
Method
Step 1: Whisk the Wet Ingredients
Preheat your oven to 350°F (175°C) and line a large baking sheet with parchment paper. In a large mixing bowl, aggressively whisk together the warm melted butter, brown sugar, and white sugar. Pro Tip: Whisk for at least 60 seconds until the mixture lightens in color and looks glossy. This helps dissolve the sugars and guarantees a chewy center.Step 2: Incorporate the Egg and Vanilla
Crack the room-temperature egg into the bowl and add the vanilla extract. Whisk gently just until the egg is fully incorporated. Actionable Tip: If you forgot to take your egg out of the fridge, place it in a bowl of warm water for 5 minutes before using.Step 3: Fold in the Dry Ingredients
Sprinkle the all-purpose flour, baking soda, and salt directly over the wet mixture. Using a rubber spatula, fold the ingredients together gently. Crucial Note: Stop mixing as soon as the last streak of flour disappears. Overmixing develops gluten, which leads to tough, cakey cookies rather than tender ones. (Want more baking science? [Check out our guide to flour types here]).Step 4: The Chocolate Chip Cascade
Pour in your chocolate chips and fold them into the cookie dough with 3 or 4 gentle strokes. Pro Tip: Reserve about a quarter cup of the chocolate chips. Pressing a few extra chips into the top of the dough balls right before baking gives them that professional, bakery-window appearance.Step 5: Scoop and Bake
Using a standard cookie scoop (about 1.5 tablespoons), drop the dough onto your prepared baking sheet, spacing them 2 inches apart. Bake on the middle rack for 9-11 minutes. The edges should be golden brown, but the centers will look slightly underbaked. Let them rest on the hot pan for 5 minutes before transferring to a wire cooling rack.