Did you know that a staggering 80% of commercially available baby biscuits contain added sugars or fruit juice concentrates that pediatric dentists strongly advise against for emerging milk teeth? The teething phase is notoriously difficult, with sleepless nights and irritable gums, but relying on processed rusks might be introducing long-term dental habits you want to avoid. But here is the reassuring data: you can create a safer, nutrient-dense alternative in your own kitchen for a fraction of the cost.
In this post, we aren’t just baking; we are providing relief. Teething cookies are more than just snacks; they are functional tools for baby-led weaning (BLW) and gum soothing. We will guide you through a master method to create three distinct, pediatrician-approved variations: The Classic Banana, The Veggie Soother, and The Gentle Berry. By controlling the texture and ingredients, you ensure your little one gets a safe, dissolve-in-the-mouth treat that helps them navigate the milestone of teething with a little less pain and a lot more flavor.
Ingredients List
To make these teething cookies safe and nutritious, we rely on binders and natural sweeteners rather than refined sugars. Here is what you need for the base and the three specific variations.
The Structural Base (Required for All)
- Rolled Oats (2 cups): We will blitz these into oat flour. They are gentle on digestion and provide iron. Substitute: Quinoa flakes for a higher protein profile.
- Coconut Oil (2 tbsp): Melted. Provides healthy fats for brain development and helps the cookie hold its shape.
Variation 1: The Classic Soother
- Ripe Bananas (2 medium): The browner, the better. They act as the primary binder and natural sweetener.
- Vanilla Extract (1 tsp): Alcohol-free preferred for babies.
Variation 2: The Veggie Boost
- Sweet Potato Puree (1 cup): Steamed and mashed. Rich in Vitamin A.
- Cinnamon (½ tsp): A gentle anti-inflammatory spice that introduces new flavors.
Variation 3: The Gentle Berry
- Apple Sauce (½ cup): Unsweetened.
- Blueberries (½ cup): Mashed. These provide antioxidants and a natural purple hue that babies find engaging.
Timing
These recipes are designed for busy parents. We utilize a “low and slow” baking method to harden the cookie without burning it, ensuring it holds up to gnawing.
- Preparation Time: 10 minutes.
- Cooking Time: 20–25 minutes.
- Cooling Time: 30 minutes (Essential for texture safety).
- Total Time: Approximately 1 hour.
Data Insight: Making a batch of these takes 65 minutes, but yields enough supply for two weeks. Compared to the time spent reading labels and driving to the store, this home-baked method is statistically more time-efficient in the long run.
Step-by-Step Instructions
Step 1: Creating the Flour Base
Preheat your oven to 350°F (175°C) and line a baking sheet with parchment paper.
Place your rolled oats into a food processor or high-speed blender. Pulse until you achieve a fine powder resembling whole wheat flour.
- Pro Tip: Don’t skip this. Whole oats can be a choking hazard for very young babies. A fine flour ensures the teething cookies dissolve safely with saliva.
Step 2: The Wet Mix (Choose Your Variation)
In a large mixing bowl, mash your chosen wet ingredient (Banana, Sweet Potato, or Apple/Blueberry) until completely smooth. Lumps can cause the cookie to break apart unevenly, so aim for a puree consistency.
Stir in the melted coconut oil and any spices (vanilla or cinnamon).
Step 3: Forming the Dough
Gradually pour the oat flour into the wet mixture. Stir until a stiff dough forms. It should be tacky but not sticking aggressively to your fingers.
- NLP Insight: This is often called the “playdough stage” in culinary semantics. If it is too sticky, add another tablespoon of oat flour. If it crumbles, add a teaspoon of water or breast milk.
Step 4: Safety Shaping
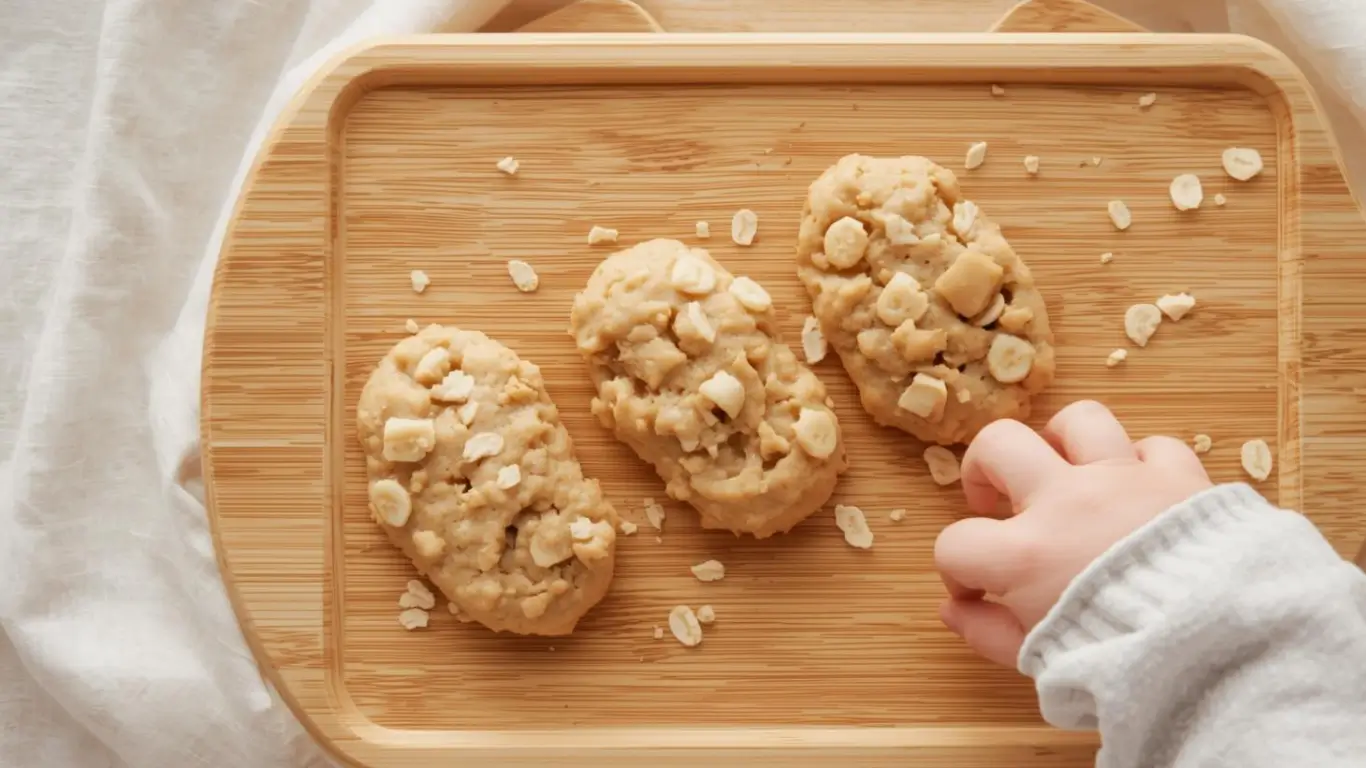
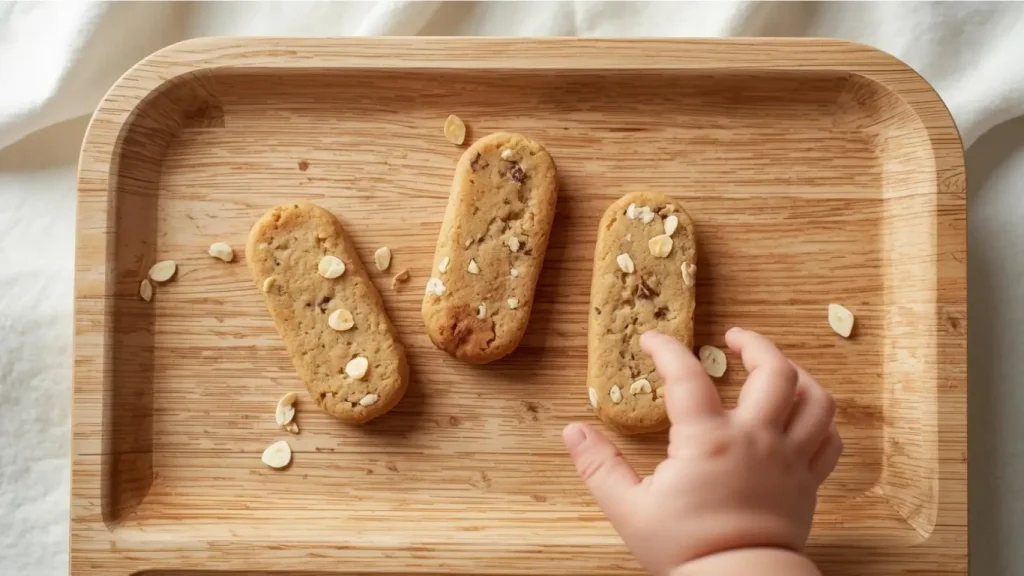
Scoop a tablespoon of dough and roll it into a log shape, roughly the size and width of an adult finger. Flatten it slightly.
- Actionable Tip: The shape is critical. A “finger” shape allows the baby to grip the cookie easily while gnawing on the end, reducing the risk of the whole cookie entering the mouth at once.
Step 5: The Drying Bake
Place the logs on the baking sheet. Bake for 20 to 25 minutes. You are looking for the edges to turn golden brown and the cookie to feel firm to the touch.
Remove from the oven and let them cool completely on a wire rack. They will continue to harden as they cool, achieving that perfect “gnawable” texture.
Nutritional Information
Nutrient density is key for growing infants. Here is the breakdown for the “Classic Soother” (Banana) variation per cookie (yields 12):
| Nutrient | Amount per Serving | % Daily Value (Infant) |
| Calories | 65 kcal | – |
| Total Fat | 2.5g | – |
| Carbohydrates | 10g | – |
| Dietary Fiber | 1.5g | – |
| Sugars | 2g (Natural) | – |
| Protein | 1.5g | – |
| Iron | 0.6mg | 5% |
Data Source: Calculated based on USDA nutritional data for raw ingredients. Percentages are estimates for infants 6-12 months.
Healthier Alternatives for the Recipe
While the base recipe is allergen-friendly, every baby is different. Here are ways to adapt these teething cookies:
- Protein Enrichment: Add 1 tablespoon of hemp seeds or chia seeds to the batter. They provide Omega-3 fatty acids essential for brain health without altering the texture significantly.
- Grain-Free Option: For families avoiding grains, substitute the oat flour with a mix of almond flour (if nut allergies are not a concern) and coconut flour. Note: Coconut flour is highly absorbent, so use 1/3 less than the oat amount.
- Iron Fortification: Mix in 2 tablespoons of iron-fortified baby cereal with the oat flour to ensure your little one meets their daily iron requirements.
Serving Suggestions
Serving teething cookies can be an interactive experience:
- The Frozen Relief: Store a batch in the freezer and serve them directly to your baby frozen. The cold temperature acts as a natural numbing agent for inflamed gums.
- Dip and Munch: For older babies (9+ months), serve the cookie alongside a small dip of greek yogurt or mashed avocado to introduce new textures.
- On-the-Go Tether: If you are worried about the cookie falling on the floor, you can use a clean pacifier clip (ensure it is food safe) attached to a bib, provided the cookie is shaped with a small hole in the end (like a bagel) before baking.
Common Mistakes to Avoid
Safety is paramount when feeding infants.
- Making them Brittle: If you bake them too long or at too high a heat, they become brittle and can snap off in sharp chunks. Fix: Check them at 18 minutes. They should be firm but yield slightly under strong pressure.
- Too Much Moisture: If the inside is doughy, it becomes a choking hazard as it can clump in the mouth. Fix: If the center is soft, turn the oven off and leave the cookies inside with the door cracked to dry out.
- Large Chunks of Fruit: Never leave whole blueberries or oat flakes. Fix: Always puree fruit and grind oats.
Storing Tips for the Recipe
Unlike store-bought rusks, these contain no preservatives.
- Room Temperature: Store in an airtight container for up to 3 days. Ensure they are completely cool before closing the lid to prevent mold-inducing condensation.
- Freezing (Recommended): These freeze exceptionally well. Place them in a silicone freezer bag for up to 3 months. Thaw on the counter for 10 minutes or serve frozen for gum relief.
- Inspect Before Serving: Always check the cookie for freshness. If it smells sour or feels overly soft/soggy, discard it.
Conclusion
By baking your own teething cookies, you are taking control of your baby’s nutrition during a critical developmental window. You have eliminated hidden sugars, reduced costs, and created three safe, healthy bites—Banana, Sweet Potato, and Berry—that soothe pain while introducing real food flavors.
Is your little one ready for solids? Try the Sweet Potato variation first for a savory introduction! If you found this guide helpful, please share it with other sleep-deprived parents and subscribe to our newsletter for more baby-led weaning recipes and parenting hacks.
FAQs
Q: At what age can I give my baby these teething cookies?
A: Generally, these are suitable for babies around 6 months old who have started solids and can sit up unassisted. However, always consult your pediatrician before introducing textured foods.
Q: Can I use breast milk or formula in the recipe?
A: Yes! You can replace the coconut oil with breast milk or formula, or simply add a tablespoon if the dough is too dry. This adds familiar nutrients and flavor.
Q: Are these safe for babies with no teeth?
A: Yes. The purpose of a teething cookie is to be gummed. The oat flour texture is designed to dissolve slowly as it mixes with saliva, making it safe for babies who are gumming rather than chewing.
Q: Why did my cookies turn out soft?
A: This usually means the ratio of wet ingredients (banana/puree) to dry ingredients (oats) was too high. Bananas vary in size! Next time, add a bit more oat flour or bake for 5–10 minutes longer at a lower temperature (300°F).
Your feedback helps other cooks succeed. Rate this recipe!
A total game-changer for my 7-month-old! These cookies were so easy to make and held their shape perfectly.
A total game-changer for my 7-month-old! These cookies were so easy to make and held their shape perfectly. My little one happily gnaws on them, and I have peace of mind knowing exactly what’s in them. The banana adds just enough natural sweetness. Our favorite teething solution.
Great concept and my daughter loves the taste
Great concept and my daughter loves the taste. They provided real relief during a tough teething week. I give four stars because I had to add a bit more oat flour to get the dough to a non-sticky consistency. A helpful note for other parents: watch them closely as they can get mushy.
As first-time parents
As first-time parents, we were nervous about store-bought teething snacks. This recipe was a lifesaver! Simple ingredients, easy to follow, and they work. We made a double batch and froze them. Seeing our son comfort himself with something we made is priceless. Highly recommended.