Step 1: The Ultimate Setup and Mise en Place
Before you even open a jar of vanilla or unwrap your butter, preheat your conventional oven to 350°F (175°C). Temperature accuracy is paramount in minimal-spread baking because the margin for error is incredibly thin. If your oven runs hot, the sugars will caramelize too quickly and burn the delicate bottoms of your intricate shapes. It is highly recommended to use an independent internal oven thermometer to verify the temperature. Line several heavy-duty, light-colored aluminum baking sheets with high-quality parchment paper or non-stick silicone baking mats. Avoid using dark non-stick baking pans, as culinary data shows they absorb and radiate heat much faster, leading to a scorched undercarriage that will taste bitter and ruin the visual aesthetic.Step 2: The Binding Process and Emulsification
In the large bowl of a heavy-duty stand mixer fitted with the paddle attachment, combine your 2 cups of room-temperature European butter and 2 cups of granulated white sugar. Begin mixing on low speed to prevent the sugar from flying out, then increase the speed to medium-high. Beat this mixture for exactly three to four minutes. You are executing a vital mechanical process called creaming, which forces thousands of microscopic air bubbles into the butterfat. Once the mixture is pale, fluffy, and cloud-like, scrape down the sides of the bowl. Add the room-temperature eggs one at a time, followed by the vanilla bean paste. Initially, the mixture may look incredibly disjointed and somewhat slimy as the water content of the egg white rejects the heavy oils of the butter. Do not panic. Continue to mix with deliberate force. Within about 60 to 90 seconds, a fascinating chemical emulsion occurs. The mixture will suddenly seize up and transform into a thick, cohesive, and remarkably glossy batter.Step 3: Precision Portioning and Rolling
Turn the mixer down to the absolute lowest "stir" setting. Gradually add your precisely weighed flour and sea salt mixture in three separate additions. Stop the mixer the very second the last streak of white flour disappears; overmixing at this stage will rapidly develop the gluten network, resulting in a tough, unpalatable texture. Turn the dough out onto a clean work surface and divide it into four equal portions. Rather than chilling the dough in thick, useless disks, roll each portion immediately between two large sheets of parchment paper to a precise, uniform thickness of 1/4 inch. Use high-quality rolling pin guides or dough strips to ensure that every single piece will eventually bake evenly and at the exact same rate. Stack these flat, parchment-sandwiched sheets of dough on a baking tray and place them into the refrigerator for a minimum of 120 minutes.Step 4: Cutting and Thematic Shaping
Once the rolled dough is incredibly firm and cold to the touch, remove one sheet from the refrigerator. Peel back the top layer of parchment paper. Using your chosen thematic, high-quality metal cutters—such as elegant multi-tiered cakes, intricate floral plaques, classic doves, or personalized monograms—press firmly and decisively straight down into the cold dough. Do not twist the cutter, as twisting seals the edges and prevents the dough from rising evenly, causing a distorted, domed top. Because the dough is chilled, the shapes will lift away easily and maintain their razor-sharp, flawless silhouettes. Place the cut shapes onto your prepared baking sheets, leaving exactly two inches of empty space between each one to allow for adequate heat circulation.Step 5: Harnessing the Maillard Reaction
Place your baking sheet onto the center rack of your preheated oven. Bake for exactly 12 to 14 minutes, depending on the physical size of your chosen cutters. You are looking for a very specific, nuanced visual cue: the extreme outer edges should appear matte, dry, and set, and the very bottom rim should take on a faint, golden-brown hue. This subtle color change is visual evidence of the Maillard reaction, where amino acids and reducing sugars create complex, savory-sweet flavor compounds that elevate the taste profile immensely. The top centers of the disks will still look incredibly soft, puffy, and potentially underbaked. This is exactly what you want. Do not leave them in the oven longer to "brown all over," or they will dry out and turn into crumbly, tasteless dust once cooled.S
tep 6: The Critical Cooling Phase
Remove the baking sheet from the oven. At this stage, the baked goods are far too fragile to be moved; attempting to lift them with a spatula will result in them crumbling apart and ruining your hard work. You must allow them to undergo "carryover cooking." Let them sit completely undisturbed on the hot baking sheet for exactly 5 to 7 minutes. The residual heat radiating from the aluminum pan will gently finish baking the centers while the structural egg proteins set and firm up permanently. After this resting period, carefully transfer them to a wire cooling rack using a thin, flexible metal spatula. You must allow them to cool completely to room temperature (at least 60 minutes) before attempting to apply any icing; even a microscopic amount of residual heat will cause the royal icing to melt and slide right off the edges.Step 7: The Royal Icing Flood Technique
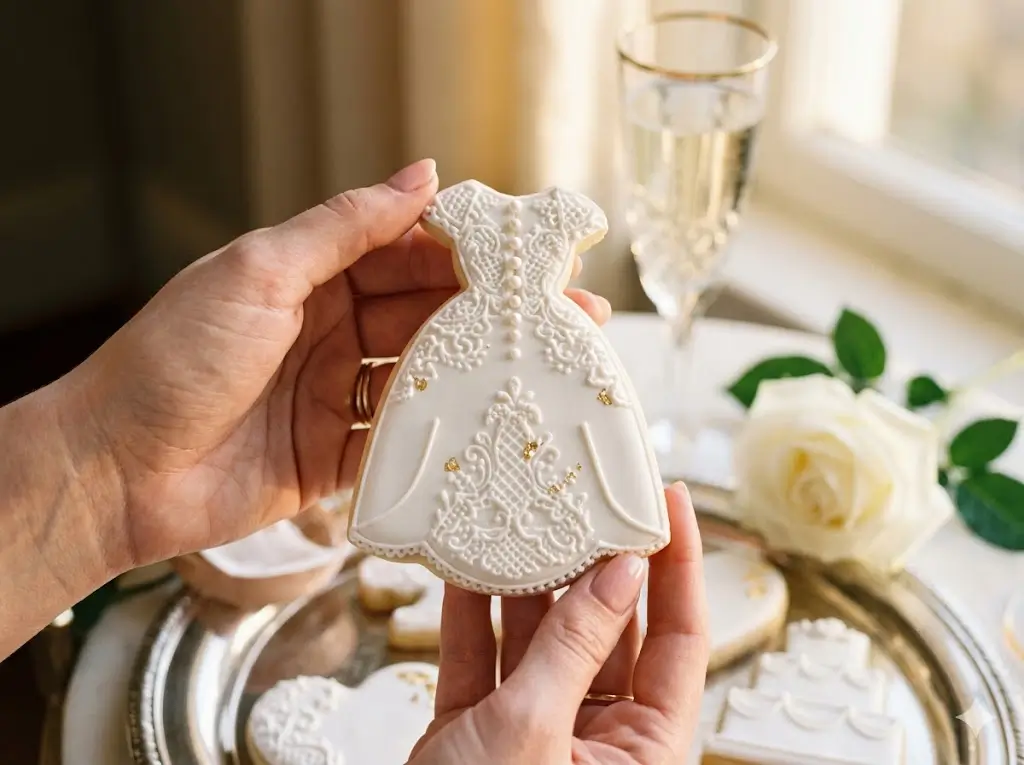
In a clean, grease-free mixer bowl, whisk the meringue powder and warm water until a thick, foamy lather forms. Add the sifted confectioners' sugar and beat on medium-high speed for 5 to 7 minutes until stiff, glossy peaks form. This is your "stiff consistency" base. Divide the icing into smaller bowls to create your wedding color palette using high-quality, concentrated gel food coloring (never use liquid grocery store coloring, as it alters the chemistry of the icing). To decorate, you must thin a portion of the colored icing with tiny droplets of water until it reaches "15-second flood consistency"—meaning a knife drawn through the surface of the icing will heal perfectly flat in exactly 15 seconds. Transfer this to a piping bag. Carefully outline the border of your shape, then immediately fill (or "flood") the interior. Use a specialized scribe tool or a simple toothpick to pop any microscopic air bubbles and gently guide the icing into sharp corners. Set them completely flat in a dry, room-temperature area for 12 to 24 hours to cure into a brilliant, hard, porcelain-like finish.tep 6: The Critical Cooling Phase
Remove the baking sheet from the oven. At this stage, the baked goods are far too fragile to be moved; attempting to lift them with a spatula will result in them crumbling apart and ruining your hard work. You must allow them to undergo "carryover cooking." Let them sit completely undisturbed on the hot baking sheet for exactly 5 to 7 minutes. The residual heat radiating from the aluminum pan will gently finish baking the centers while the structural egg proteins set and firm up permanently. After this resting period, carefully transfer them to a wire cooling rack using a thin, flexible metal spatula. You must allow them to cool completely to room temperature (at least 60 minutes) before attempting to apply any icing; even a microscopic amount of residual heat will cause the royal icing to melt and slide right off the edges.Step 7: The Royal Icing Flood Technique
In a clean, grease-free mixer bowl, whisk the meringue powder and warm water until a thick, foamy lather forms. Add the sifted confectioners' sugar and beat on medium-high speed for 5 to 7 minutes until stiff, glossy peaks form. This is your "stiff consistency" base. Divide the icing into smaller bowls to create your wedding color palette using high-quality, concentrated gel food coloring (never use liquid grocery store coloring, as it alters the chemistry of the icing). To decorate, you must thin a portion of the colored icing with tiny droplets of water until it reaches "15-second flood consistency"—meaning a knife drawn through the surface of the icing will heal perfectly flat in exactly 15 seconds. Transfer this to a piping bag. Carefully outline the border of your shape, then immediately fill (or "flood") the interior. Use a specialized scribe tool or a simple toothpick to pop any microscopic air bubbles and gently guide the icing into sharp corners. Set them completely flat in a dry, room-temperature area for 12 to 24 hours to cure into a brilliant, hard, porcelain-like finish.