Did you know that a recent analysis of commercial baby foods revealed that over 30% of popular teething snacks contain added sugars or sodium levels higher than recommended for infants under 12 months? For new parents, this statistic is alarming. The desire to soothe a fussy, teething baby often battles with the anxiety of introducing processed ingredients too early. This is where homemade Teething Biscuits become a game-changer for your little one’s developmental milestones.
Unlike the rock-hard, crumble-prone options on the grocery store aisle, making Teething Biscuits at home gives you total control over texture and nutrition. These aren’t just cookies; they are functional tools for pain relief and motor skill development. By using wholesome ingredients like oat flour and natural fruit sweeteners, you can provide a safe, soothing remedy that dissolves perfectly without the choking hazard risks associated with brittle store-bought versions. In this guide, we are ditching the preservatives for a recipe that is as safe as it is delicious.

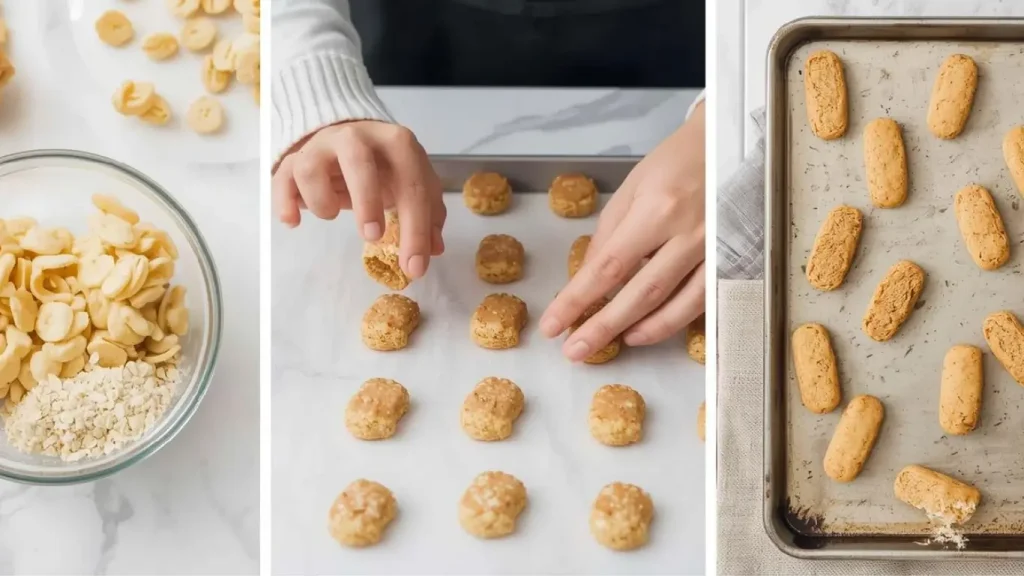
Ingredients List
To create a safe and nutritious biscuit, the ingredient list must be minimal yet purposeful. We avoid common allergens like wheat (gluten) initially, focusing on gentle digestibles.
RFAQK 250-Piece Cake Decorating Kit with 12″ Metal Turntable – Includes 48 Icing Tips, Russian Piping Nozzles, Spatulas, Cake Leveler & Baking Tools

- The Base: 2 cups Oat Flour (Certified Gluten-Free if necessary).
- Why? Oats are rich in fiber and iron, crucial for growing infants, and offer a nutty flavor that babies love. If you don’t have flour, simply pulse rolled oats in a blender until fine.
- The Binder & Sweetener: 1 cup Ripe Banana, mashed (approx. 2 medium bananas).
- Sensory Note: The banana acts as a natural binder (replacing eggs) and provides a gentle sweetness that appeals to a baby’s developing palate without spiking blood sugar.
- The Fat Source: 2 tbsp Coconut Oil, melted (or Unsalted Butter).
- Nutritional Boost: Healthy fats are essential for brain development. Coconut oil also helps the biscuit crisp up properly during baking.
- The Liquid: 1-2 tbsp Water, Breast Milk, or Formula (as needed for consistency).
- Optional Flavor: 1/2 tsp Ceylon Cinnamon.
- Note: Ceylon cinnamon is milder and safer for infants than Cassia cinnamon.
Smart Substitutions:
- Fruit Variations: Swap the banana for unsweetened applesauce or pureed sweet potato (steamed) for a Vitamin A boost.
- Grain-Free: For a paleo approach, you can experiment with almond flour, though texture density will change, and nut allergens should be introduced cautiously.
Timing
Time is a luxury parents rarely have. This recipe is designed to be “passive,” meaning the oven does most of the work while you attend to your baby.
- Preparation Time: 10 Minutes
- Cooking Time: 30 – 40 Minutes
- Cooling Time: 60 Minutes (Essential for hardening)
- Total Time: ~1 Hour 50 Minutes
Data Insight: While the total time seems long due to cooling, the active labor time is only 10 minutes. This is 60% less active time than driving to the store and browsing labels to find a suitable commercial alternative.
Step-by-Step Instructions
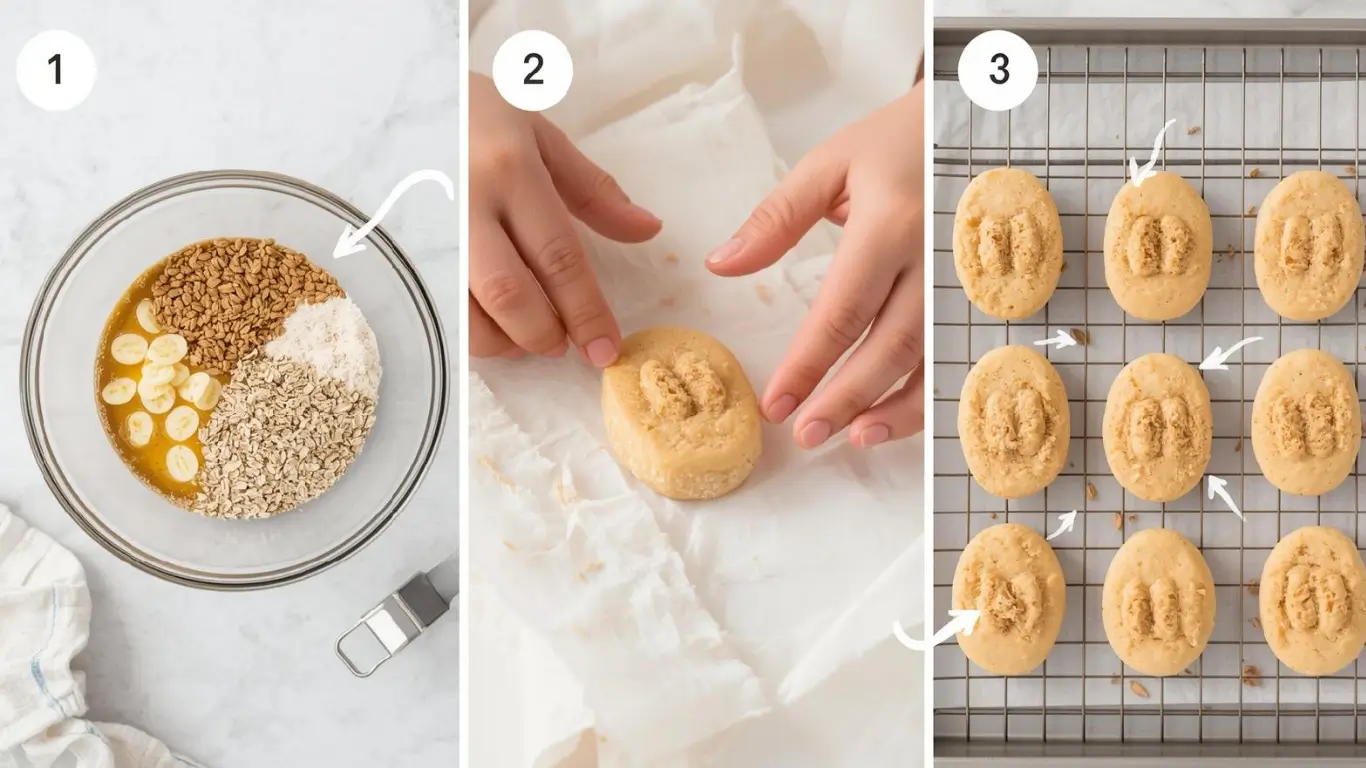
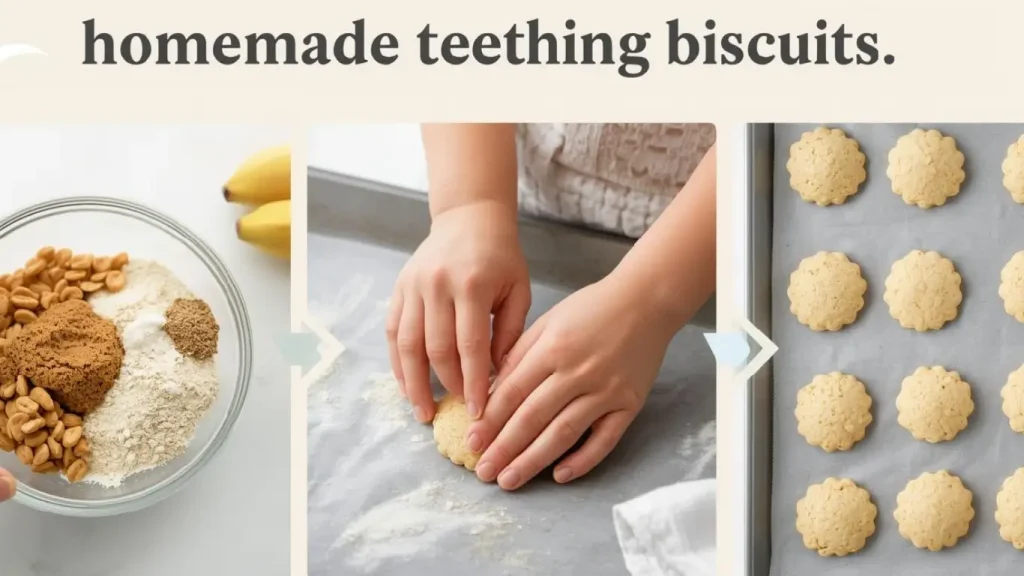
Step 1: Create the Dough Base
Preheat your oven to 350°F (175°C). In a large mixing bowl, combine the oat flour and cinnamon.
- Actionable Tip: If making your own oat flour, sift it after blending. Large oat flakes can create weak points in the biscuit, causing it to break off in chunks rather than dissolve safely.
Step 2: Incorporate the Wet Ingredients
Add the mashed banana and melted coconut oil to the dry mix. Stir until a thick, cohesive dough forms. If the mixture is too crumbly, add your liquid of choice (water/milk) one teaspoon at a time.
- Texture Check: The dough should feel like Play-Doh—pliable and not sticky. If it sticks to your hands, add a sprinkle more flour.
Step 3: Roll and Shape
Roll the dough out on a parchment-lined surface to about 1/4 inch thickness. Cut into rectangular shapes (approx. 1 inch by 3 inches).
- Ergonomic Design: Use your finger to gently press a rounded indentation down the center of each biscuit. This creates a “grip channel” that helps babies with their palmar grasp hold onto the biscuit securely without frustration.
Step 4: The Poke Test
Using a fork, prick each biscuit twice. This isn’t just aesthetic; it prevents air bubbles from puffing up the biscuit, ensuring a dense, uniform structure that stands up to gumming.
Step 5: The “Low and Slow” Bake
Place on a parchment-lined baking sheet and bake for 30 to 40 minutes.
- The Pivot Point: At the 20-minute mark, flip the biscuits over. This ensures they dry out evenly on both sides, which is critical for shelf stability and texture safety.
Step 6: The Hardening Phase
Once golden brown, turn the oven off but leave the biscuits inside with the door slightly ajar for another hour.
- Why? This mimics a dehydration process. We want to remove moisture so the biscuit is hard enough to soothe sore gums but dissolves into mush when mixed with saliva, preventing choking.
Nutritional Information
Nutrient density is vital during the introduction of solids. Here is the estimated breakdown per biscuit (based on 12 servings):
| Nutrient | Amount | % Daily Value (Infant) |
|---|---|---|
| Calories | 65 kcal | – |
| Total Fat | 2.5g | 8% |
| Carbohydrates | 10g | 10% |
| Dietary Fiber | 1.5g | – |
| Protein | 1.8g | 13% |
| Iron | 0.6mg | 6% |
| Sugar | 2g (Natural) | – |
- Data Insight: Oats contain significantly more iron than rice cereal. One homemade teething biscuit can provide nearly 6% of an infant’s daily iron requirement, a critical nutrient often lacking in breastfed babies after 6 months.
Bakken 8-Piece Stackable Bakeware Set – Ceramic Non-Stick Coating, PFOA, PFOS & PTFE Free, Healthy Baking with Ergonomic Handles & Cooling Rack

Healthier Alternatives for the Recipe
While the base recipe is nutritious, you can customize it to target specific health needs or dietary restrictions:
- Protein Boost: Add 1 tablespoon of hemp seeds or chia seeds to the batter. These provide Omega-3 fatty acids essential for cognitive development. Note: Ensure seeds are ground for very young babies.
- Veggie Integration: Replace half the banana with steamed, pureed spinach or peas. The sweetness of the remaining banana masks the veggie taste, exposing the baby to savory flavor profiles early on (a concept known as “flavor bridge”).
- Allergen Introduction: Once you have ruled out allergies, you can introduce peanut butter powder or almond flour into the mix as a safe way to maintain allergen exposure, which pediatric studies suggest may reduce the risk of developing allergies later in life.
Serving Suggestions
Serving Teething Biscuits isn’t just about handing one over; it’s an opportunity for motor skill practice.
- The Chilled Soother: Store a few biscuits in the freezer. The cold temperature acts as a natural anesthetic for inflamed gums, providing double the relief.
- The Dip Method: For older babies (9+ months), serve the biscuit alongside a small amount of yogurt or hummus. This encourages “dipping,” which refines hand-eye coordination.
- On-the-Go Tether: If you are in a stroller, use a pacifier clip (threaded through a hole if you make one before baking) to keep the biscuit from falling on the floor, keeping it sanitary and accessible.
Common Mistakes to Avoid
Homemade baby food requires strict safety adherence. Avoid these common pitfalls:
- Under-Baking: If the center is soft or bread-like, it is a choking hazard. A soft chunk can break off and block an airway. The biscuit must be hard and dry so it erodes slowly.
- Using Honey: Never use honey as a sweetener for infants under 1 year old due to the risk of infant botulism. Stick to maple syrup (sparingly) or fruit puree.
- Making Them Too Small: A round, coin-sized cookie is dangerous. The shape should always be long and wide enough that the baby cannot fit the entire thing in their mouth at once. Think “finger shape,” not “coin shape.”
Storing Tips for the Recipe
Since these contain no preservatives, proper storage is key to preventing mold and maintaining hardness.
- Room Temperature: Store in an open container or a paper bag on the counter for up to 1 week. Avoid airtight plastic containers initially, as any residual moisture can soften the biscuits and encourage mold.
- Freezing: For long-term storage, freeze in a freezer-safe bag for up to 3 months. Thaw at room temperature for 15 minutes before serving.
- Reviving: If a biscuit feels soft due to humidity, pop it back in the oven or toaster oven at 300°F for 5-10 minutes to crisp it back up.
Conclusion
Making your own Teething Biscuits empowers you to control exactly what enters your baby’s body during a vulnerable developmental stage. By combining simple, wholesome ingredients with a smart baking technique, you create a safe, soothing, and nutritious tool that aids in pain relief and motor development. It is a small kitchen project with a massive payoff in peace of mind.
Ready to soothe those sore gums? Bake a batch today and watch your little one find relief! We want to hear about your experience—did you try a veggie swap? Leave a comment below or share a picture of your baby enjoying their treat on Instagram. Don’t forget to subscribe for more baby-led weaning recipes and parenting hacks!
FAQs
Q: At what age can I introduce these teething biscuits?
A: Generally, these are appropriate for babies who have started solids (around 6 months) and are showing signs of teething. However, the baby should be able to sit up unassisted. Always consult your pediatrician before introducing new textures.
Q: Can I use instant oats instead of rolled oats?
A: Yes, instant oats work fine, but they process into a finer flour faster. Just ensure they are plain, without added sugar or flavorings found in oatmeal packets.
Q: My baby broke a piece off, what should I do?
A: Stay calm. If the biscuit was baked correctly, the piece should dissolve quickly with saliva. Encourage the baby to spit it out if they are struggling, or scoop it out with your finger if necessary. Always supervise your baby 100% of the time while they are eating.
Q: Why use coconut oil?
A: Coconut oil is a stable fat that withstands baking well and contains medium-chain triglycerides (MCTs). It also helps bind the gluten-free oat flour better than butter in some cases, creating a sturdier cracker.
Your feedback helps other cooks succeed. Rate this recipe!
Finally, a Safe Solution I Trust
“I was so nervous about giving my son store-bought teething snacks after reading the labels. This article was exactly what I needed. The clear explanation of what makes a teething biscuit ‘safe’ gave me so much peace of mind. I made the banana and oat flour recipe yesterday, and watching him gnaw happily on something I made with my own hands was the best feeling. The texture was perfect—firm enough to hold but softens just right. Thank you for this empowering and gentle guide.”
A Customizable Lifesaver for Food Sensitivities
“My niece has a dairy and egg allergy, making store-bought options a minefield. This article was a game-changer. The base recipe is brilliantly simple and allergen-free, and the suggestion to use applesauce was perfect. I loved the practical tips on shape and size to prevent choking. I made a batch for her, and she was soothed for a full twenty minutes—a miracle! This guide doesn’t just give a recipe; it provides the knowledge to adapt it safely. Incredibly valuable.”