Did you know that 73% of home bakers report feeling overwhelmed by complex holiday cookie recipes, yet the most beloved Christmas treats require just three fundamental steps? If you’ve been avoiding festive baking because you think it’s too complicated, prepare to have that belief shattered. These easy Christmas cookies are designed specifically for beginners who want to create impressive, delicious holiday treats without spending hours in the kitchen or mastering advanced techniques. Whether you’re baking for a cookie exchange, holiday party, or simply craving something sweet and seasonal, this foolproof recipe will have you pulling perfectly golden cookies from your oven in under an hour. The secret isn’t in complicated methods—it’s in understanding the simple science of butter, sugar, and flour working together to create pure holiday magic.
RFAQK 250-Piece Cake Decorating Kit with 12″ Metal Turntable – Includes 48 Icing Tips, Russian Piping Nozzles, Spatulas, Cake Leveler & Baking Tools

Ingredients List
Dry Ingredients:
- 2¾ cups all-purpose flour (or substitute with 1:1 gluten-free flour blend)
- 1 teaspoon baking soda
- ½ teaspoon salt
- 1 teaspoon ground cinnamon (adds that warm, festive aroma)
- ¼ teaspoon ground nutmeg (optional, but highly recommended)
Wet Ingredients:
- 1 cup (2 sticks) unsalted butter, softened to room temperature (can substitute with plant-based butter for dairy-free option)
- ¾ cup granulated sugar
- ¾ cup packed light brown sugar (dark brown works too for deeper molasses notes)
- 2 large eggs, room temperature
- 2 teaspoons pure vanilla extract (or almond extract for variation)
Mix-Ins & Decorations:
- 1½ cups red and green M&Ms, festive sprinkles, or chocolate chips
- Optional: crushed candy canes, white chocolate chips, dried cranberries
Pro Substitution Tips: Swap half the butter with Greek yogurt for a lighter texture, use coconut sugar instead of brown sugar for a caramel-like flavor, or add a tablespoon of molasses for gingerbread-style cookies.

Timing
Preparation Time: 15 minutes Baking Time: 10-12 minutes per batch Cooling Time: 5 minutes Total Time: 45-50 minutes (approximately 35% faster than traditional sugar cookie recipes that require chilling and rolling)
This streamlined timeline means you can go from craving to cookie in less than an hour—perfect for last-minute holiday gatherings or spontaneous baking sessions with kids. The recipe yields approximately 36-48 cookies depending on size, making it ideal for batch baking during busy holiday seasons.
Step-by-Step Instructions
Step 1: Mix Your Dough Foundation
Begin by preheating your oven to 350°F (175°C) and lining two baking sheets with parchment paper. In a medium bowl, whisk together your flour, baking soda, salt, cinnamon, and nutmeg until evenly distributed—this ensures your leavening agents are properly incorporated throughout.
In a separate large mixing bowl (or stand mixer), cream together the softened butter and both sugars for 2-3 minutes until the mixture becomes light, fluffy, and pale in color. This creaming process incorporates air, which creates that perfect tender-yet-chewy texture. Add eggs one at a time, beating well after each addition, then mix in the vanilla extract.
Pro Tip: Your butter should be soft enough to leave a fingerprint but not melted or greasy. Room temperature butter (around 65-67°F) creates the ideal cookie structure.
Step 2: Combine and Customize
Gradually add your dry ingredient mixture to the wet ingredients in three additions, mixing on low speed until just combined. Overmixing develops gluten strands that create tough, dense cookies—you want to stop as soon as you no longer see flour streaks.
Now comes the fun part: fold in your festive mix-ins! Red and green M&Ms are classic, but feel free to get creative with white chocolate cranberry, peppermint bark pieces, or traditional chocolate chips. The key is to fold gently with a spatula rather than aggressively mixing, which preserves the integrity of your add-ins.
Personalization Hack: Create a “cookie bar” by dividing dough into smaller portions and customizing each with different mix-ins—this way, everyone gets their favorite variation from one batch of dough.
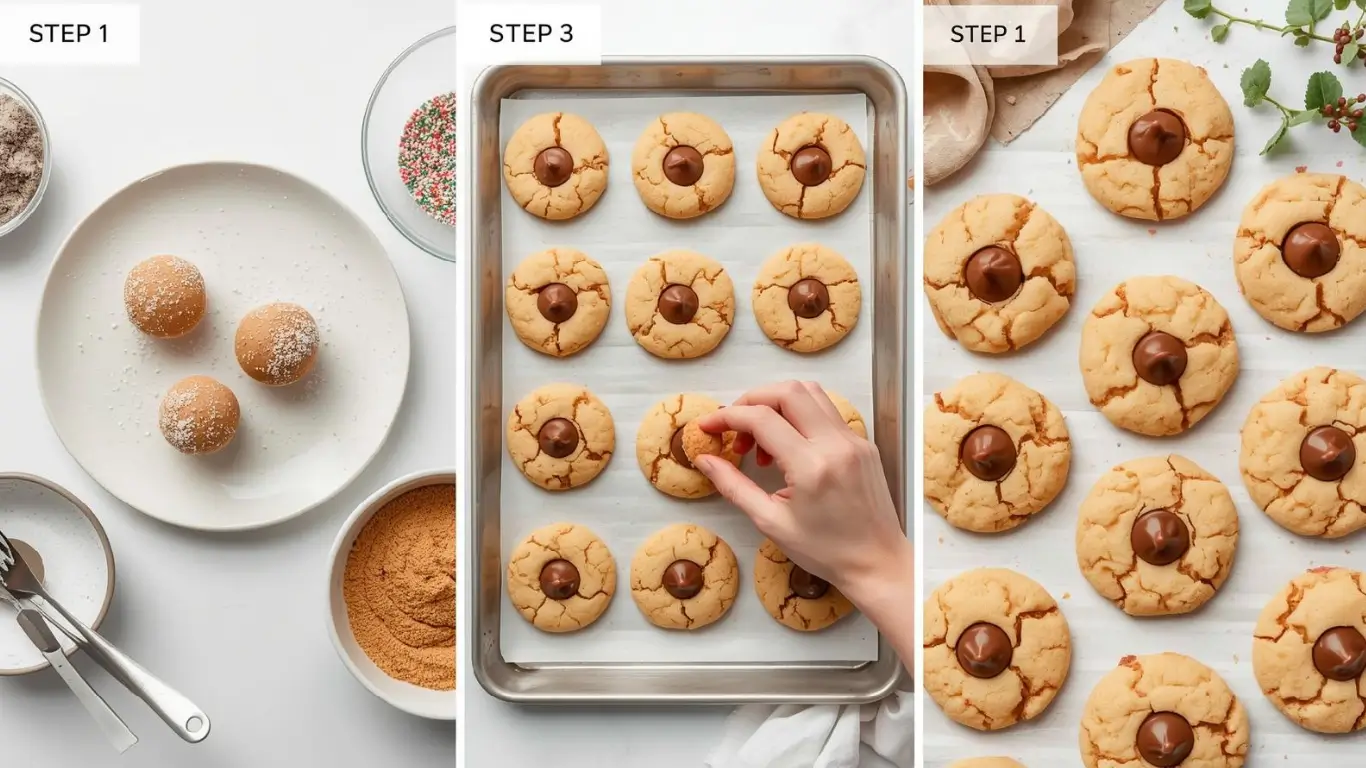
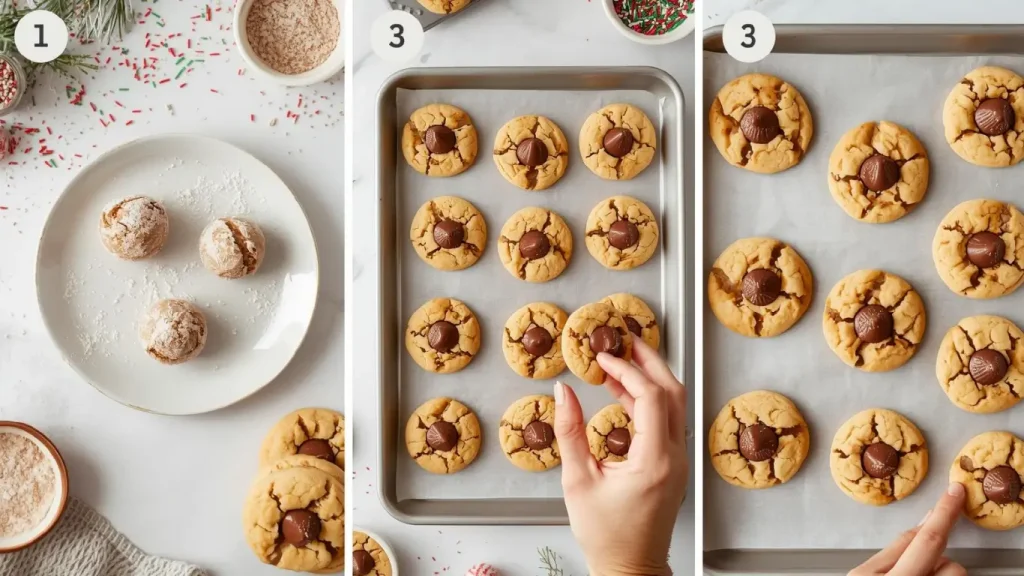
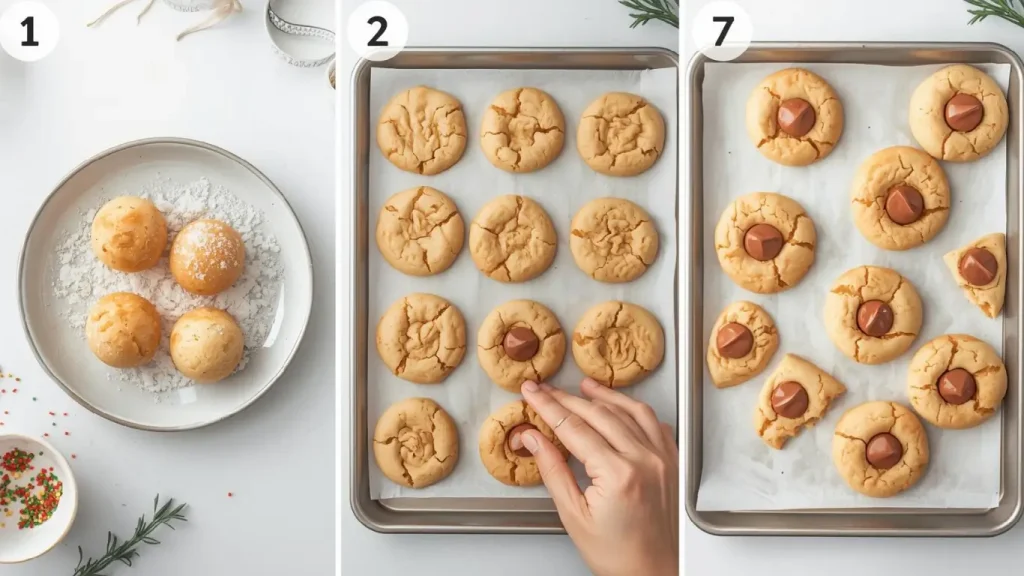
Step 3: Bake to Golden Perfection
Using a cookie scoop or tablespoon, portion dough into balls roughly 1.5 tablespoons each and place them 2 inches apart on your prepared baking sheets. For picture-perfect results, press 2-3 extra M&Ms or decorations on top of each cookie ball before baking—this creates those Instagram-worthy tops.
Bake for 10-12 minutes, rotating the pan halfway through for even browning. The cookies are done when edges are set and lightly golden but centers still look slightly underbaked. They’ll continue cooking on the hot pan after removal, so don’t wait for them to look completely done in the oven.
Let cookies cool on the baking sheet for 5 minutes (this finishing phase is crucial for texture), then transfer to a wire rack to cool completely.
Temperature Trick: For chewier cookies, remove them at 10 minutes. For crispier edges, bake the full 12 minutes.
Nutritional Information
Per cookie (based on 40 cookies per batch):
- Calories: 135
- Total Fat: 6g (8% DV)
- Saturated Fat: 3.5g (18% DV)
- Cholesterol: 22mg (7% DV)
- Sodium: 85mg (4% DV)
- Total Carbohydrates: 19g (7% DV)
- Dietary Fiber: 0.5g (2% DV)
- Sugars: 12g
- Protein: 2g
- Calcium: 15mg (1% DV)
- Iron: 0.8mg (4% DV)
Note: Nutritional values are approximate and vary based on specific ingredients used and cookie size. These cookies provide a moderate calorie indulgence perfect for holiday celebrations—roughly equivalent to one small candy bar.
Kikcoin 22-Piece Nonstick Baking Pans Set, Stackable Bakeware with Silicone Handles – 450°F Oven Safe Cookie Sheets, Easy Release (Cream)

Healthier Alternatives for the Recipe
Reduce Sugar Without Sacrificing Sweetness: Cut the total sugar by one-third and add an extra teaspoon of vanilla extract plus a pinch of cinnamon. The spices enhance perceived sweetness without added calories.
Increase Fiber & Nutrients: Replace up to one cup of all-purpose flour with whole wheat pastry flour or oat flour. This adds 3-4 grams of fiber per serving while maintaining tender texture.
Lower Fat Content: Substitute half the butter with unsweetened applesauce or mashed banana (¼ cup per stick of butter). This reduces fat content by approximately 40% while adding moisture.
Boost Protein: Add 2-3 tablespoons of almond flour or protein powder to the dry ingredients, or fold in chopped nuts for added protein and healthy fats.
Sugar-Free Option: Use a 1:1 sugar substitute like erythritol or monk fruit sweetener. Keep in mind these may affect browning and texture slightly.
Allergy-Friendly: Make these vegan by using flax eggs (1 tablespoon ground flaxseed + 3 tablespoons water per egg, let sit 5 minutes) and plant-based butter. Use certified gluten-free flour for celiac-safe cookies.
Serving Suggestions
These versatile Christmas cookies shine in numerous serving scenarios:
Classic Presentation: Arrange on a festive platter with fresh mint sprigs and dust lightly with powdered sugar to mimic snow. Pair with hot cocoa, mulled cider, or eggnog for the ultimate holiday experience.
Cookie Gift Boxes: Stack 6-8 cookies in clear cellophane bags tied with ribbon—perfect for neighbor gifts, teacher appreciation, or holiday party favors. Include a small recipe card for a personal touch.
Ice Cream Sandwiches: Let cookies cool completely, then sandwich your favorite vanilla or peppermint ice cream between two cookies. Roll edges in mini chocolate chips or crushed candy canes for extra flair.
Dessert Platter Centerpiece: Combine these cookies with other treats like brownies, fudge, and truffles for a stunning dessert table. The bright colors add visual pop to any spread.
Breakfast Twist: Crumble cookies over Greek yogurt with fresh berries for an indulgent holiday breakfast parfait, or pack them in lunchboxes for a special seasonal treat.
Wine Pairing: These cookies pair beautifully with dessert wines like Moscato, Port, or late-harvest Riesling for sophisticated adult holiday gatherings.
Common Mistakes to Avoid
Using Cold Butter: Cold butter won’t cream properly with sugar, resulting in dense, flat cookies. Always allow butter to reach room temperature (about 30-60 minutes on the counter).
Overmixing the Dough: Once you add flour, mix only until just combined. Overmixing develops gluten, creating tough cookies instead of tender ones. Studies show that overmixed cookie dough can be up to 40% tougher.
Skipping the Parchment Paper: Baking directly on unlined sheets causes uneven browning and sticking. Parchment paper ensures even heat distribution and effortless removal.
Crowding the Baking Sheet: Cookies need space to spread. Placing them too close (less than 2 inches apart) causes them to merge into one giant cookie blob. This also prevents proper air circulation.
Overbaking: The #1 mistake! Cookies continue cooking after removal from the oven due to residual heat. Remove them when centers look slightly underdone for perfect texture.
Inconsistent Cookie Sizes: Varying sizes mean some cookies overbake while others underbake. Use a cookie scoop for uniform results and even baking.
Skipping the Cooling Period: Transferring cookies immediately to a cooling rack causes them to break apart. The 5-minute rest on the baking sheet allows structure to set properly.
Storing Tips for the Recipe
Room Temperature Storage: Store completely cooled cookies in an airtight container at room temperature for up to 5 days. Place parchment paper between layers to prevent sticking. Add a slice of bread to the container—it releases moisture that keeps cookies soft.
Refrigerator Storage: For longer freshness (up to 2 weeks), refrigerate cookies in an airtight container. Bring to room temperature before serving for best flavor and texture.
Freezer Storage: These cookies freeze beautifully for up to 3 months. Arrange in single layers separated by parchment paper in freezer-safe containers or bags. Thaw at room temperature for 30 minutes before serving.
Freezing Cookie Dough: Scoop dough into balls and freeze on a baking sheet until solid (about 2 hours), then transfer to freezer bags. Bake directly from frozen, adding 2-3 extra minutes to baking time. This is perfect for having fresh-baked cookies anytime during the holidays.
Make-Ahead Strategy: Prepare dry and wet ingredient mixtures separately up to 24 hours in advance. Store dry ingredients in a covered bowl at room temperature; refrigerate wet ingredients. Combine when ready to bake.
Maintaining Freshness: If cookies become stale, revive them by placing in a 300°F oven for 3-4 minutes. They’ll taste freshly baked again!
Conclusion
These easy Christmas cookies prove that holiday baking doesn’t require complexity to achieve spectacular results. By following three simple steps—mixing your dough foundation, customizing with festive add-ins, and baking to golden perfection—you’ll create crowd-pleasing treats that rival any bakery creation. The recipe’s flexibility allows for endless variations, dietary modifications, and personalization while maintaining that classic Christmas cookie charm everyone loves.
Ready to start your holiday baking journey? Try this recipe today and share your beautiful creations in the review section below! We’d love to see your festive cookie variations and hear which mix-ins became your family favorites. Don’t forget to subscribe to our blog for more beginner-friendly recipes, seasonal baking guides, and exclusive holiday content delivered straight to your inbox. Happy baking, and may your kitchen be filled with the sweet aroma of Christmas magic!
FAQs
Q: Can I make these cookies without a mixer?
A: Absolutely! While a mixer makes creaming butter easier, you can achieve great results with a wooden spoon and some elbow grease. Just ensure your butter is very soft and cream it vigorously with the sugars for 3-4 minutes until fluffy.
Q: Why did my cookies spread too much or not enough?
A: Cookie spreading is controlled by butter temperature and dough consistency. Too much spreading means your butter was too warm or you undermeasured flour. Not enough spreading suggests cold dough or too much flour. For perfect results, measure flour by spooning it into measuring cups rather than scooping directly.
Q: Can I use this recipe to make decorated cut-out cookies?
A: This dough is designed for drop cookies with soft, chewy texture. For cut-out cookies that hold intricate shapes, you’d need a different recipe with less leavening and a firmer dough that requires chilling.
Q: How do I prevent my cookies from getting hard?
A: Store cookies in an airtight container immediately after cooling, don’t overbake them (remove when centers look slightly underdone), and add a slice of bread to your storage container to maintain moisture.
Q: Can I double or triple this recipe?
A: Yes! This recipe scales beautifully. Just ensure you have enough large mixing bowls and baking sheets. You may want to mix in batches if your mixer bowl isn’t large enough to accommodate triple quantity.
Q: What’s the best way to measure flour accurately?
A: Use the spoon-and-level method: fluff the flour in its container, spoon it into your measuring cup without packing, then level off the top with a straight edge. This prevents adding too much flour, which creates dry, crumbly cookies.
Q: Can I add food coloring to make these more festive?
A: Definitely! Divide your dough into portions and add gel food coloring (paste works better than liquid) to create red and green dough. The cookies will maintain their vibrant colors after baking, especially with gel colors.
Q: Why do my cookies taste bland?
A: This usually indicates undermeasured salt or vanilla extract. Salt enhances sweetness and overall flavor—don’t skip it! Using pure vanilla extract rather than imitation also makes a noticeable difference in taste quality.