Did you know that the average homemade Easter cookie recipe takes 2-3 hours from start to finish, leaving busy families scrambling to prepare festive treats during an already hectic holiday weekend? What if you could create stunning, delicious Easter cookies in just 45 minutes using only six basic ingredients? This streamlined recipe revolutionizes spring baking by eliminating unnecessary complexity while delivering picture-perfect results that will impress at any Easter gathering. These simple Easter cookies prove that holiday baking doesn’t require elaborate decorating skills, specialty equipment, or an entire afternoon in the kitchen. Whether you’re preparing treats for an Easter egg hunt, a spring brunch, or simply want to create festive cookies with your children, this time-saving approach delivers professional-quality Easter sugar cookies, decorated Easter treats, and spring-themed cookies that capture the joy of the season without the stress.
Kikcoin 22-Piece Nonstick Baking Pans Set, Stackable Bakeware with Silicone Handles – 450°F Oven Safe Cookie Sheets, Easy Release (Cream)

Ingredients List
Creating these delightful Easter cookies requires just six pantry-friendly ingredients:
- 2 ½ cups all-purpose flour (substitute with a 1:1 gluten-free flour blend for celiac-friendly Easter cookies, or use half whole wheat pastry flour for added nutrition)
- 1 cup unsalted butter, softened to room temperature (vegan butter or coconut oil works wonderfully for dairy-free Easter cookies, maintaining that tender, melt-in-your-mouth texture)
- 1 cup granulated sugar (swap with organic cane sugar for less processed sweetness, or use ¾ cup for a less sweet cookie that balances perfectly with frosting)
- 1 large egg plus 1 egg yolk (use 3 tablespoons aquafaba—chickpea liquid—as a vegan substitute that creates surprisingly similar binding properties)
- 2 teaspoons vanilla extract (almond extract creates a delightfully different flavor profile reminiscent of Italian Easter cookies)
- ½ teaspoon salt (sea salt or kosher salt both work beautifully to enhance sweetness and balance flavors)
Optional decorating ingredients that transform basic cookies into festive Easter treats: pastel food coloring, sprinkles, royal icing, edible glitter, or melted white chocolate for drizzling.

Timing
This recipe’s efficiency is what makes it truly special for busy Easter preparations:
- Preparation Time: 15 minutes
- Chilling Time: 20 minutes (can be done while preheating oven or preparing other dishes)
- Baking Time: 10-12 minutes per batch
- Cooling and Decorating: 10-15 minutes
- Total Time: 45-60 minutes
Compared to traditional Easter cookie recipes that often require 2-3 hours including elaborate decorating time, this streamlined version saves you approximately 60-70% of your time. The simplified ingredient list means less shopping, less measuring, and significantly less cleanup—leaving more time for Easter egg dyeing, family activities, and enjoying the holiday itself. Many bakers report that this recipe allows them to complete their Easter baking in one evening rather than spreading it across an entire weekend.
Step-by-Step Instructions
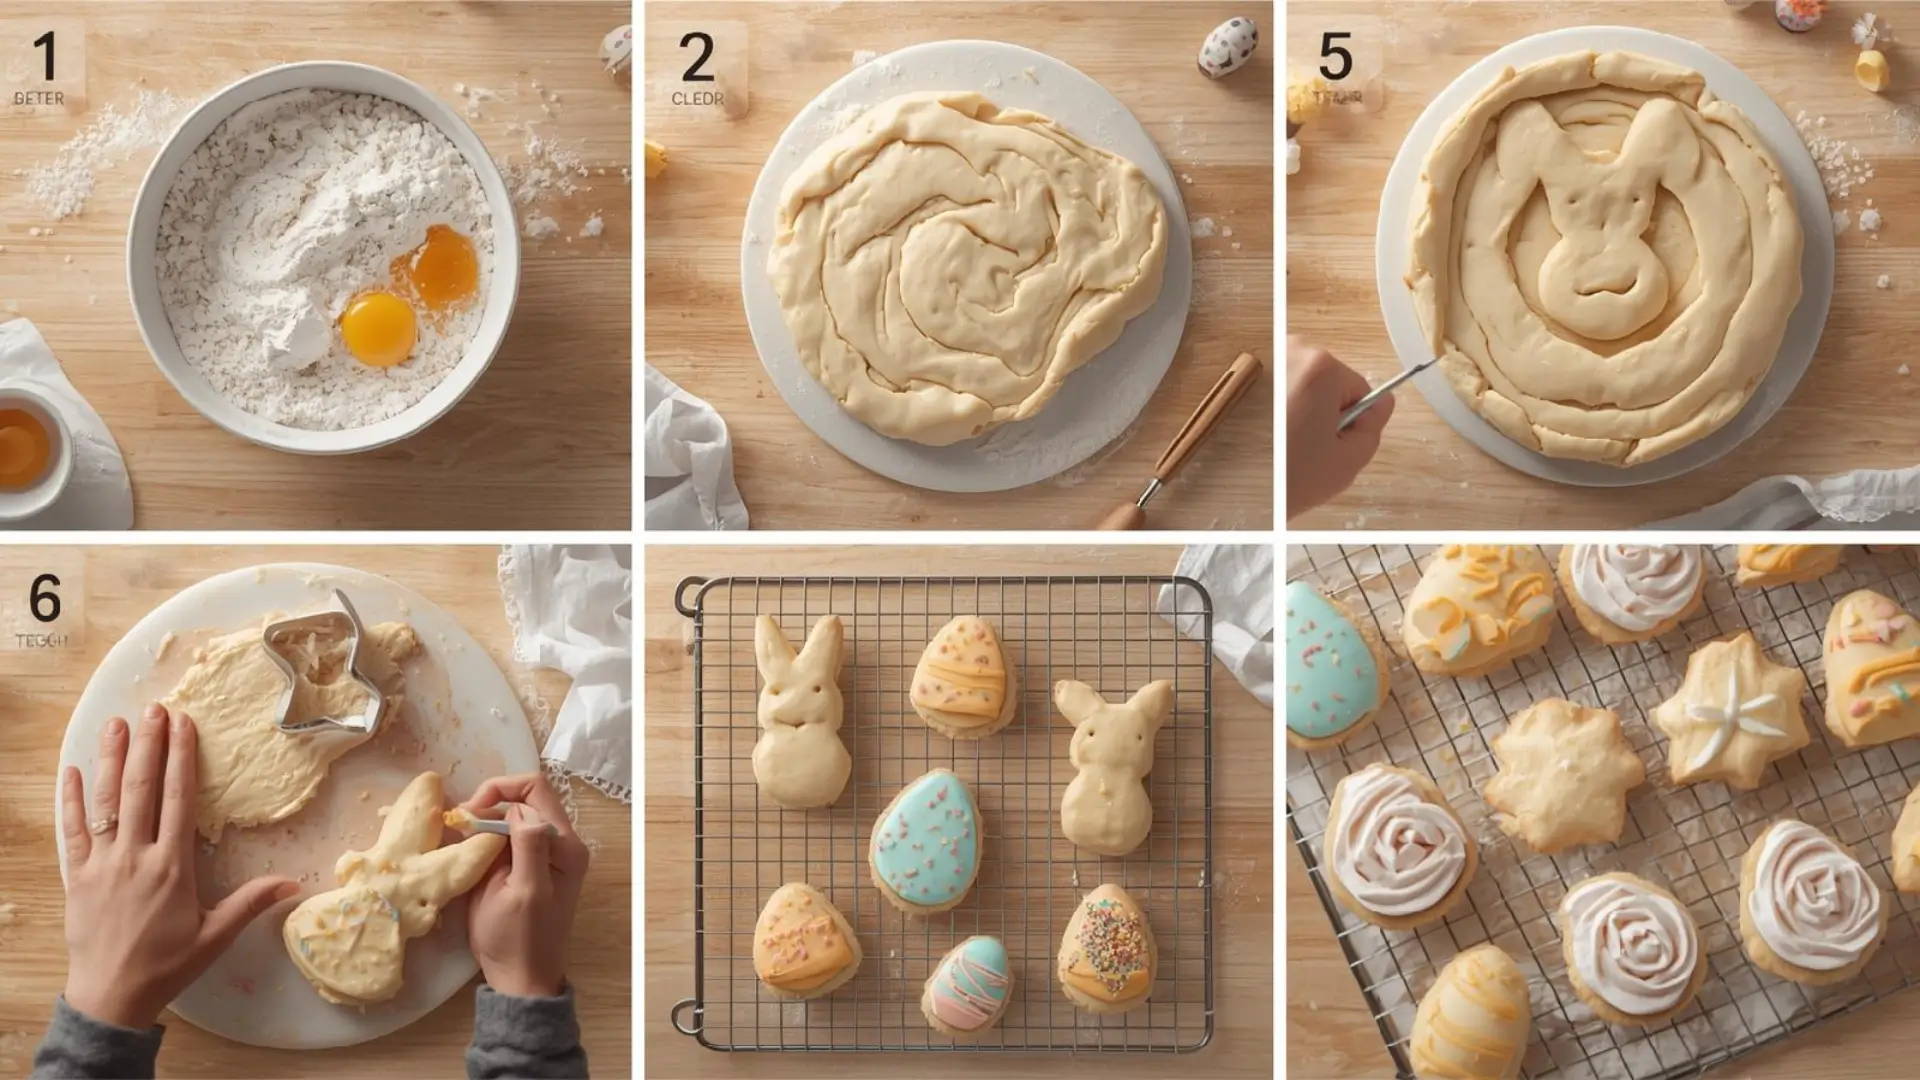
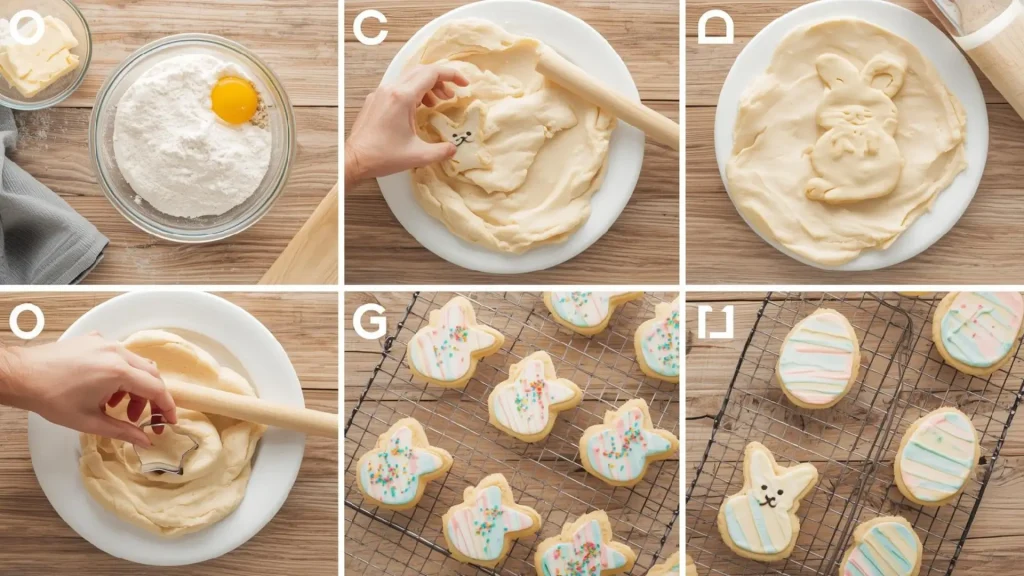
Step 1: Cream Butter and Sugar
Begin by placing softened butter and granulated sugar in a large mixing bowl. Using an electric mixer on medium-high speed, beat for 4-5 minutes until the mixture becomes pale, fluffy, and has increased significantly in volume. This crucial creaming process incorporates air bubbles that create tender, light Easter cookies rather than dense, heavy ones. The mixture should look almost white and feel noticeably lighter in texture. Pro tip: Properly softened butter should leave a slight indent when pressed but shouldn’t be greasy or melted—this is the secret to perfectly textured Easter cookies.
Step 2: Add Eggs and Vanilla
Add the whole egg, egg yolk, and vanilla extract to the creamed butter mixture. Beat on medium speed for 2-3 minutes until completely incorporated and the mixture appears smooth and glossy. The extra egg yolk is the secret ingredient that creates Easter cookies with exceptional tenderness and a beautiful golden color. Scrape down the sides and bottom of the bowl to ensure even mixing—any unmixed butter or sugar creates inconsistent texture in your finished cookies.
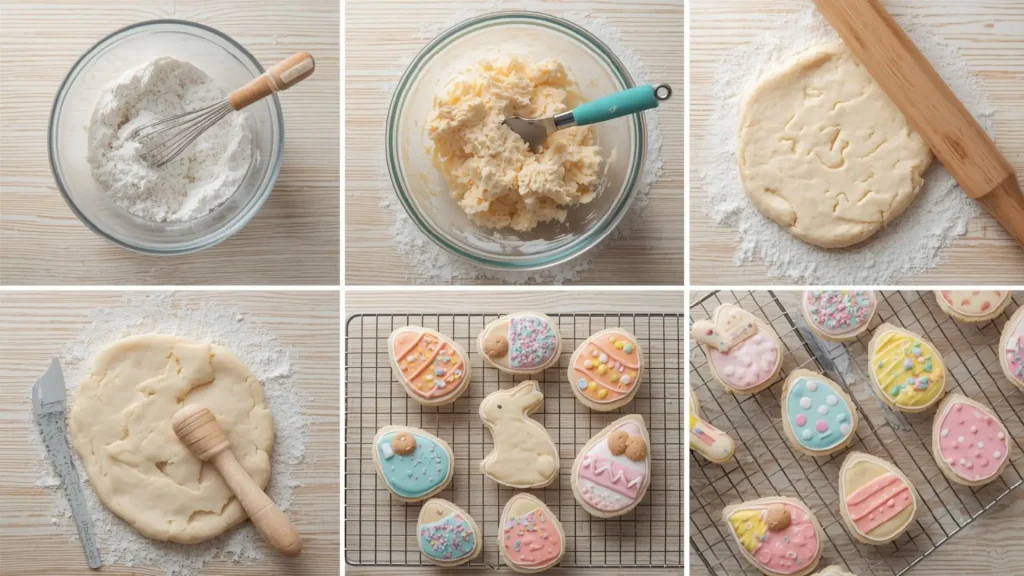
Step 3: Combine Dry Ingredients
In a separate bowl, whisk together the all-purpose flour and salt. This simple step ensures even salt distribution throughout your Easter cookies, preventing salty pockets that can ruin the eating experience. Gradually add the flour mixture to the wet ingredients in three additions, mixing on low speed after each addition until just combined. The dough will transition from shaggy to cohesive—stop mixing as soon as no flour streaks remain. Overmixing at this stage develops gluten, resulting in tough Easter cookies instead of tender, crumbly ones.
Step 4: Chill the Dough
Form the dough into a flat disk, wrap tightly in plastic wrap, and refrigerate for 20 minutes. While this might seem like an optional step, chilling is absolutely essential for Easter cookies that hold their shape during baking. Cold dough spreads less, creating crisp edges and soft centers rather than thin, crispy cookies. This chilling time also allows the flour to fully hydrate, improving texture and making the dough easier to roll. Use this time productively: preheat your oven to 350°F (175°C), prepare baking sheets with parchment paper, or clean up your mixing area.
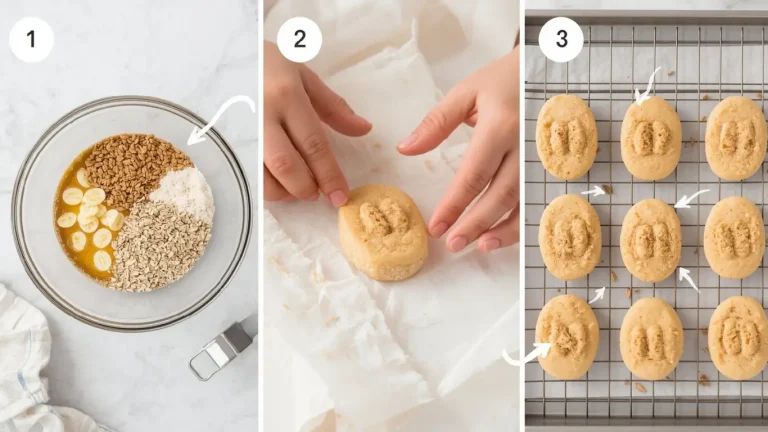
Step 5: Roll and Cut
On a lightly floured surface, roll the chilled dough to approximately ¼-inch thickness. Too thin and your Easter cookies become brittle; too thick and they’ll be cakey rather than crisp-tender. Use Easter-themed cookie cutters—bunnies, eggs, chicks, flowers, carrots—to cut shapes from the dough. Work efficiently, cutting shapes as close together as possible to minimize scraps. Gather dough scraps, briefly knead them together, re-roll once, and cut additional shapes. Avoid re-rolling more than twice, as excessive handling toughens the dough. Transfer cut shapes to prepared baking sheets, spacing them 1 inch apart.
Step 6: Bake to Perfection
Bake Easter cookies for 10-12 minutes, until the edges just begin to turn golden but centers still appear slightly pale and soft. The cookies will seem underdone, but this is intentional—they continue baking from residual heat after removal from the oven. Overbaked Easter cookies lose their tender texture and become hard and brittle. Allow cookies to cool on the baking sheet for 3 minutes to firm up, then carefully transfer to a wire cooling rack. Once completely cool (about 15 minutes), they’re ready for decorating with royal icing, buttercream, or simple colored sugar.
Nutritional Information
Each Easter cookie (recipe yields approximately 24 cookies, depending on cutter size) contains:
- Calories: 128
- Total Fat: 7g (9% Daily Value)
- Saturated Fat: 4.5g
- Trans Fat: 0g
- Cholesterol: 28mg (9% Daily Value)
- Sodium: 52mg (2% Daily Value)
- Total Carbohydrates: 15g (5% Daily Value)
- Dietary Fiber: 0.3g
- Sugars: 8g
- Added Sugars: 8g
- Protein: 1.5g
- Vitamin A: 6% Daily Value
- Calcium: 1% Daily Value
- Iron: 4% Daily Value
Nutritional Insights: These Easter cookies provide a moderate calorie treat that fits within balanced eating patterns when enjoyed in moderation. The butter contributes vitamin A, important for immune function and vision, while the egg adds high-quality protein and essential amino acids. Compared to store-bought Easter cookies, which often contain 180-220 calories each along with preservatives and artificial colors, these homemade versions offer better portion control and cleaner ingredients.
CAROTE 21-Piece Nonstick Cookware Set, White Granite Induction Pots and Pans with Frying Pans & Saucepans (PFOS, PFOA Free)

Healthier Alternatives for the Recipe
Transform these Easter cookies into more nutritious treats without sacrificing the festive spirit:
Reduce Sugar: Decrease granulated sugar to ¾ cup and increase vanilla extract to 1 tablespoon. This 25% sugar reduction maintains sweetness perception while cutting 12 calories per cookie. The enhanced vanilla tricks your taste buds into perceiving more sweetness than actually exists.
Whole Grain Boost: Replace up to half the all-purpose flour with whole wheat pastry flour or white whole wheat flour. This modification adds 2g of fiber per serving, promoting better blood sugar stability and increased satiety. The lighter whole wheat varieties maintain tender texture better than traditional whole wheat flour.
Healthy Fat Swap: Substitute half the butter with Greek yogurt or mashed avocado. While unconventional for Easter cookies, this swap reduces saturated fat by 40% while adding protein and maintaining moisture. The slight tanginess from Greek yogurt even enhances vanilla flavor.
Natural Sweeteners: Use ⅔ cup coconut sugar or maple sugar instead of white sugar. These unrefined alternatives provide trace minerals and have slightly lower glycemic indexes, though nutritional differences are modest. They do impart subtle caramel notes that complement spring spices beautifully.
Nutrient Additions: Mix 2 tablespoons ground flaxseed or chia seeds into the flour. This adds omega-3 fatty acids and additional fiber with minimal impact on texture or flavor—perfect for sneaking extra nutrition into Easter cookies for children.
Protein Enhancement: Add ¼ cup vanilla protein powder, reducing flour by ¼ cup to compensate. This increases protein to 3-4g per cookie, making these Easter treats more satisfying and less likely to cause blood sugar spikes.
Serving Suggestions
Maximize the impact of your Easter cookies with these creative presentation ideas:
Easter Basket Centerpiece: Arrange decorated Easter cookies in a large basket lined with colorful tissue paper or artificial grass. Intersperse with chocolate eggs and jellybeans for a stunning edible centerpiece that doubles as dessert and decoration.
Cookie Decorating Station: Set up a DIY decorating bar with plain baked Easter cookies, bowls of colored icing, various sprinkles, and edible markers. This interactive activity entertains children and adults alike while creating personalized Easter treats everyone will love.
Ice Cream Sandwiches: Transform Easter cookies into impressive desserts by sandwiching vanilla, strawberry, or lemon ice cream between two cookies. Roll edges in pastel sprinkles for extra festivity. These freeze beautifully and can be prepared days ahead.
Easter Brunch Display: Serve Easter cookies alongside fresh fruit, hot cross buns, and mimosas on a tiered serving stand. The vertical presentation creates visual interest and makes your spread appear more abundant and professionally styled.
Gift Packaging: Place Easter cookies in cellophane bags tied with pastel ribbons, attach handwritten tags, and use as party favors, teacher gifts, or neighbor treats. Homemade Easter cookies feel more thoughtful and personal than store-bought candy.
Cookie Bouquet: Attach Easter cookies to wooden skewers using royal icing, then arrange in a flower pot filled with floral foam for an edible bouquet. This creative presentation works wonderfully as a hostess gift or table decoration.
Paired with Beverages: Serve Easter cookies with chamomile tea, vanilla-flavored coffee, or pastel-colored fruit punch. The mild vanilla flavor complements a wide range of beverages without overwhelming more delicate spring flavors.
Common Mistakes to Avoid
Ensure flawless Easter cookies by sidestepping these frequent baking pitfalls:
Using Warm Dough: Rolling un-chilled dough is the number one mistake that ruins Easter cookies. Warm dough sticks to rolling pins, tears easily, and spreads excessively during baking, destroying intricate shapes. Always chill for the full 20 minutes—patience here prevents frustration later.
Over-Flouring the Surface: Excess flour on your rolling surface gets incorporated into the dough, creating dry, tough Easter cookies. Use the minimum flour necessary to prevent sticking, brushing off any visible excess from cut shapes before baking.
Overbaking: Easter cookies continue cooking after oven removal. Baking until fully golden results in hard, brittle cookies rather than tender treats. Remove when edges just begin to color and centers still look slightly underdone—they’ll firm up perfectly during cooling.
Skipping the Egg Yolk: Some bakers omit the extra yolk to simplify, but this single ingredient dramatically impacts texture. Egg yolks contain lecithin, a natural emulsifier that creates incomparably tender Easter cookies with superior flavor and color.
Rerolling Scraps Too Many Times: Each reroll makes dough tougher as gluten develops from handling. Limit yourself to one or two re-rolls maximum. Alternatively, press final scraps into a small baking pan and bake as cookie bars to avoid waste.
Decorating Too Soon: Applying icing to warm cookies causes it to melt and slide off, ruining your designs. Always wait until Easter cookies are completely cool to room temperature before decorating—usually 20-30 minutes after baking.
Rushing the Process: While this recipe is faster than traditional Easter cookies, trying to skip steps (especially chilling) compromises results. The 45-minute timeline assumes organized preparation—read through the entire recipe before starting to work efficiently.
Storing Tips for the Recipe
Preserve the freshness and quality of your Easter cookies with these storage strategies:
Room Temperature Storage: Store completely cooled, undecorated Easter cookies in an airtight container with parchment paper between layers for up to 7 days. Keep containers in a cool, dry location away from direct sunlight and heat sources. A slice of bread placed in the container helps maintain moisture and prevents cookies from drying out.
Decorated Cookie Storage: Once royal icing or other decorations have completely dried (usually 4-6 hours), store decorated Easter cookies in single layers separated by parchment paper to prevent smudging. They’ll stay fresh and beautiful for 5-7 days at room temperature.
Refrigeration: While not necessary for sugar-based Easter cookies, refrigeration extends freshness up to 2 weeks. Store in airtight containers and allow cookies to return to room temperature before serving for optimal texture and flavor. Cold cookies can taste less sweet and more dense.
Freezing Baked Cookies: Easter cookies freeze exceptionally well for up to 3 months. Layer completely cooled cookies between parchment paper in freezer-safe containers. Thaw at room temperature for 30-45 minutes before serving or decorating. The texture remains virtually identical to freshly baked.
Freezing Unbaked Dough: Prepare dough through step 4, wrap tightly in plastic wrap, then place in a freezer bag. Freeze for up to 3 months. Thaw overnight in the refrigerator, then proceed with rolling and cutting. This strategy allows you to have fresh-baked Easter cookies with minimal effort on busy holiday mornings.
Make-Ahead Strategy: Bake cookies up to a week before Easter, freeze immediately, then thaw and decorate 1-2 days before serving. This approach spreads the workload across multiple days, reducing holiday stress while ensuring maximum freshness.
Preventing Staleness: Easter cookies become stale when exposed to air, which causes moisture loss. Always seal containers immediately after adding cookies, and avoid opening unnecessarily. If cookies do become slightly stale, refresh them by warming in a 300°F oven for 3-5 minutes.
Conclusion
These 6-ingredient Easter cookies deliver bakery-quality results in just 45 minutes, saving precious holiday time without sacrificing flavor or festive appeal. The simplified recipe eliminates unnecessary complications while producing tender, delicious sugar cookies perfect for decorating. With basic pantry staples and straightforward techniques, anyone can create impressive Easter treats that capture the joy of spring.
Ready to start baking? Try these time-saving Easter cookies this spring and discover how effortless holiday baking can be. Share photos of your decorated creations in the review section below—we love seeing your festive designs! Leave a comment with your favorite Easter cookie decorating ideas or any questions about the recipe. Subscribe to our blog for more streamlined holiday recipes and baking tips delivered straight to your inbox!
FAQs
Can I make Easter cookies without chilling the dough?
While technically possible, skipping the chill time significantly compromises results. Un-chilled dough spreads excessively during baking, causing detailed shapes to become blob-like and edges to burn before centers cook through. If you’re truly pressed for time, chill for a minimum of 10 minutes rather than the recommended 20, but expect slightly less shape retention.
How do I prevent Easter cookies from losing their shape during baking?
Three factors ensure shape retention: properly chilled dough (20 minutes minimum), correct dough thickness (¼ inch), and appropriate baking temperature. Additionally, transferring cut shapes to baking sheets while still cold helps—if dough warms during cutting, briefly chill shaped cookies on the baking sheet for 5 minutes before baking.
What’s the best way to decorate Easter cookies for beginners?
Start simple with royal icing consistency that’s thick enough to hold shape but thin enough to spread smoothly. Use squeeze bottles or piping bags for control. Outline shapes first, let dry for 10 minutes, then flood the interior. Sprinkles, edible pearls, and sanding sugar are foolproof decorating options that look professional with minimal skill.
Can I double this Easter cookie recipe?
Absolutely! This recipe doubles and triples successfully. When increasing quantities, mix ingredients in the same order but consider dividing dough into two batches for easier rolling. Large dough quantities can become unwieldy, so working with half the dough while keeping the remainder chilled makes the process more manageable.
How far in advance can I bake Easter cookies?
Undecorated Easter cookies can be baked up to 2 weeks before Easter if frozen, or one week if stored at room temperature in airtight containers. For optimal freshness and maximum time savings, bake and freeze 1-2 weeks early, then thaw and decorate 2-3 days before your celebration. Decorated cookies taste best within 3-5 days of decorating.
Why did my Easter cookies spread too much?
Excessive spreading typically results from insufficient chilling, too-warm butter, over-mixing the dough, or an oven temperature that’s too low. Ensure your butter is softened but not melted, chill dough for the full 20 minutes, mix just until combined, and verify oven temperature with an oven thermometer—many ovens run 15-25 degrees off calibration.