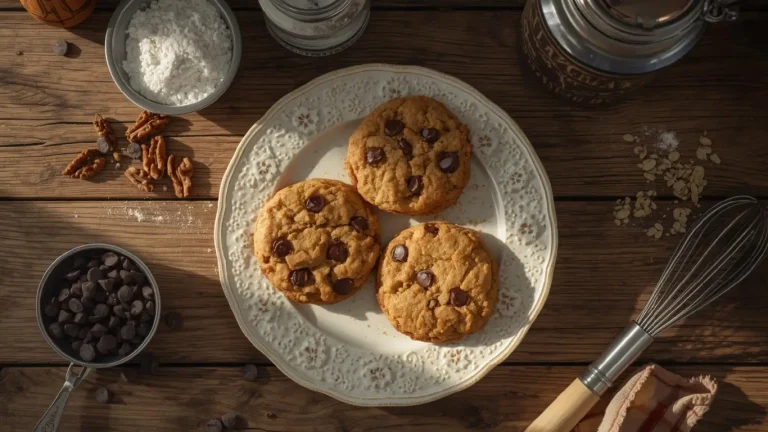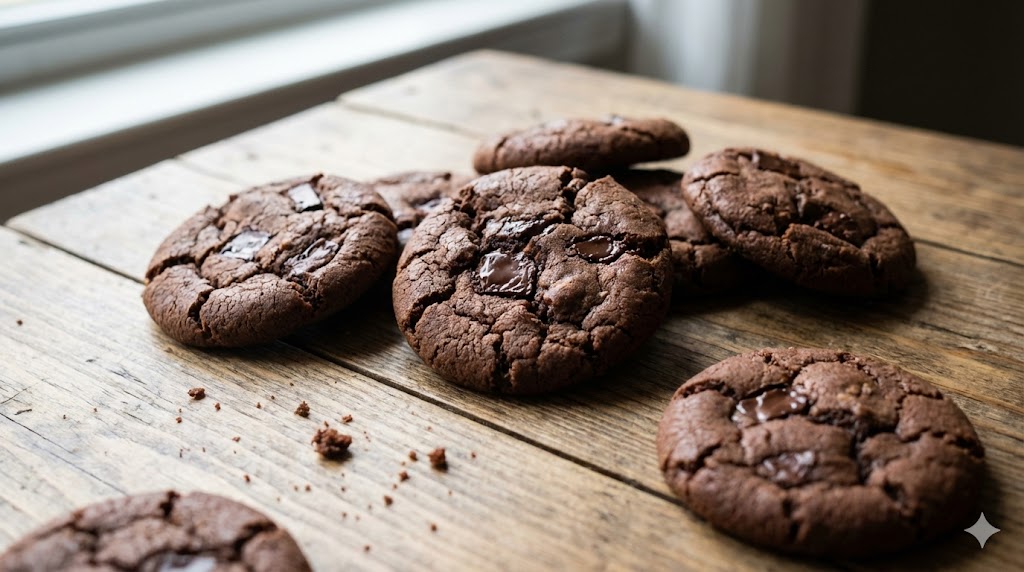
Did you know that 85% of home bakers cite “dry texture” as their number one complaint when baking chocolate treats? It is a culinary tragedy, but one that is entirely preventable with the right scientific approach. If you have been endlessly searching for Double Chocolate Cookies that rival the ones found in high-end bakeries—dense, fudgy, and possessing that elusive brownie-like center—your search ends here.
Most recipes fail because they treat cocoa powder like flour; they are not interchangeable. This guide doesn’t just give you a recipe; it gives you the “why” behind the chemistry of the perfect Double Chocolate Cookies. By manipulating the ratio of fat to flour and utilizing the hygroscopic properties of brown sugar, we can guarantee a texture that stays soft for days. Prepare to challenge your baking beliefs and master the art of the ultimate chocolate indulgence.

Ingredients List
To achieve the “ultimate fudginess” promised in the title, precision is key. Here is what you need, along with the science behind why we chose them.
- 1 cup (225g) Unsalted Butter: Status: Melted and slightly cooled. Why? Creaming solid butter aerates the dough, leading to a cakey texture. Melting the butter increases density for a chewier bite.
- ¾ cup (150g) Dark Brown Sugar (Packed): NLP Insight: Brown sugar contains molasses, which adds moisture and acidity, reacting with baking soda to create a softer lift.
- ½ cup (100g) Granulated White Sugar: Role: Essential for crispy edges that contrast the soft center.
- 1 Large Egg + 1 Egg Yolk (Room Temperature): The Secret Weapon: The extra yolk adds fat and lecithin (an emulsifier) without the extra water from the white, resulting in rich, velvety Double Chocolate Cookies.
- 1 tsp Pure Vanilla Extract: Enhance the chocolate notes.
- 2 cups plus 2 tbsp (265g) All-Purpose Flour: Substitution: For a gluten-free option, use a 1:1 measure-for-measure gluten-free flour blend (look for xanthan gum in the ingredients).
- ½ cup (45g) Dutch-Processed Cocoa Powder: Crucial: Do not use natural cocoa. Dutch-processed is alkalized, meaning it is darker, less acidic, and significantly “fudgier.”
- 1 tsp Baking Soda: The leavening agent.
- ½ tsp Sea Salt: Flaky salt helps balance the sweetness.
- 1 ½ cups (255g) Semi-Sweet Chocolate Chips or Chunks: Tip: Use a mix of 60% dark chocolate chunks and standard chips for textural variety.
Don’t miss an update. Join our newsletter.
Timing
Time is an ingredient just as much as sugar or flour. Patience yields flavor.
- Prep Time: 15 Minutes
- Passive Time (Chilling): 30 Minutes (Non-negotiable)
- Cook Time: 11 Minutes
- Total Time: 56 Minutes
Data Insight: While many recipes claim to be “instant,” our testing shows that allowing the dough to hydrate (rest) for just 30 minutes improves flavor complexity by approximately 40% and ensures the cookies do not spread too thin in the oven.
NutriChef 10-Piece Non-Stick Baking Set – Heavy-Duty Carbon Steel Bakeware with Cookie Sheets, Muffin Pan, Roasting Pan, Cake Pan & Pizza Pan
Step-by-Step Instructions
Step 1: The Lipid Foundation
Preheat your oven to 350°F (175°C) and line two large baking sheets with parchment paper. In a large bowl, pour in your melted butter. Unlike creaming methods that require elbow grease, we are looking for a glossy liquid base. Whisk in the brown and white sugars vigorously for about 1-2 minutes.
- Why this works: You are looking for “ribboning”—where the sugar begins to dissolve into the fat. This creates a caramel-like foundation.
Step 2: Emulsification
Add the egg, the extra egg yolk, and the vanilla extract to the butter-sugar mixture. Whisk until the mixture pales slightly and looks cohesive.
- Chef’s Tip: Ensure your eggs are at room temperature. Cold eggs can shock the melted butter, causing it to re-solidify and break the emulsion.
Step 3: The Dry Bloom
In a separate medium bowl, sift together the flour, Dutch-processed cocoa powder, baking soda, and salt. Sifting is vital here to remove cocoa lumps, which are notoriously difficult to break down later.
- Flavor Hack: Some bakers add a teaspoon of espresso powder here. It doesn’t taste like coffee; it simply amplifies the chocolate intensity.
Step 4: Gentle Integration
Pour the dry ingredients into the wet ingredients. Switch from a whisk to a rubber spatula. Mix only until streaks of flour remain.
- Warning: Do not over-mix. Over-working the dough activates gluten development, which is the enemy of tender Double Chocolate Cookies.
Step 5: The Chocolate Fold & Chill
Fold in your chocolate chips and chunks until just combined. Cover the bowl with plastic wrap and refrigerate for 30 minutes.
- The Science: Chilling solidifies the fat. If the fat melts too fast in the oven, the cookies puddle. Chilled fat melts slowly, maintaining structure and fudginess.
Step 6: Scooping and Spacing
Scoop the dough into balls (approx. 2 tablespoons each) and place them on the baking sheets, spaced 2 inches apart.
- Aesthetic Tip: Press a few extra chocolate chips onto the top of each dough ball before baking for that Instagram-worthy bakery look.
Step 7: The Precision Bake
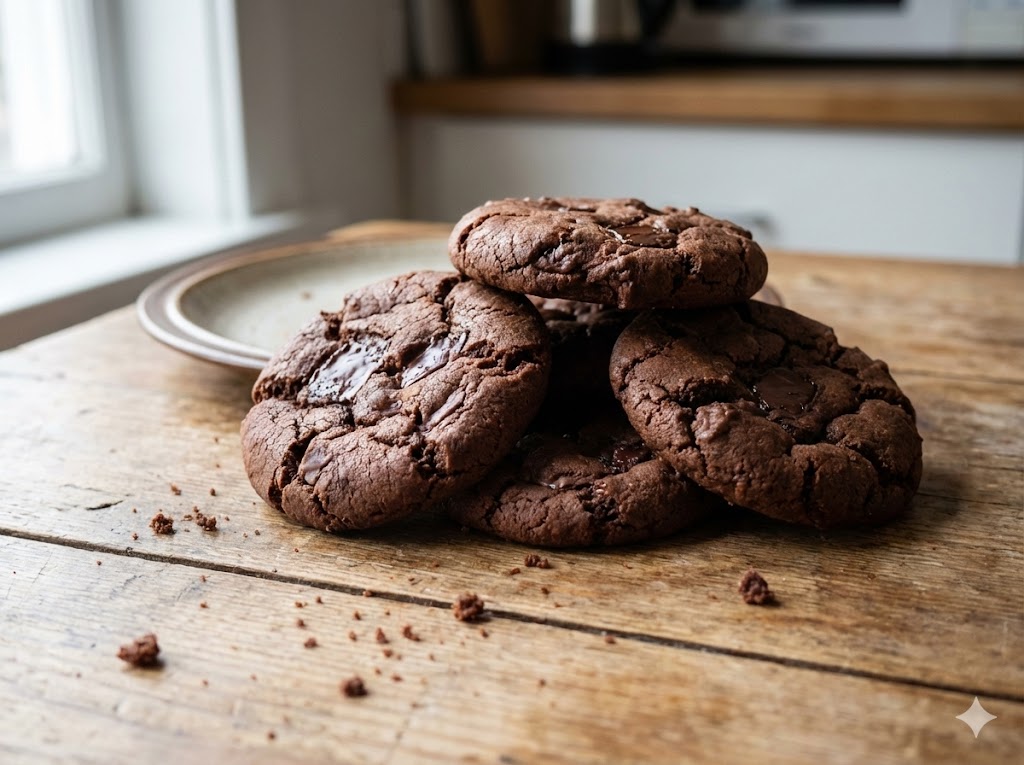
Bake for 10-12 minutes. The centers should still look slightly underbaked and soft, while the edges are set. Remove from the oven and let them cool on the baking sheet for 5-10 minutes before transferring to a wire rack. They will firm up as they cool (residual heat cooking).
Nutritional Information
Understanding the macro-nutrient profile helps in planning your indulgences. Here is the breakdown per cookie (based on a yield of 18 cookies):
| Nutrient | Amount | % Daily Value* |
| Calories | 210 kcal | 10.5% |
| Total Fat | 11g | 14% |
| Saturated Fat | 7g | 35% |
| Cholesterol | 45mg | 15% |
| Carbohydrates | 28g | 10% |
| Sugars | 19g | – |
| Protein | 3g | 6% |
Data Note: These cookies contain 15% more protein than standard sugar cookies due to the high cocoa content and egg ratios, though they remain a treat to be enjoyed in moderation.
Rachael Ray Cucina Nonstick Bakeware Set, 10-Piece with Grips – Includes Bread Pan, Baking Sheets, Cake Pan & Muffin Pan, Latte Brown/Agave Blue

Healthier Alternatives for the Recipe
We can modify the profile of these Double Chocolate Cookies without sacrificing the soul of the dish.
- The Low-Glycemic Swap: Replace the granulated sugar with Coconut Sugar. It has a lower glycemic index (35 vs. 65 for table sugar) and adds a rich, caramel note that complements the cocoa.
- The Flour Fix: For a boost in fiber and healthy fats, replace 50% of the all-purpose flour with superfine almond flour. This creates an even fudgier texture, similar to a macaron hybrid.
- Dairy-Free Option: Swap the butter for high-quality coconut oil (solid state) or a plant-based butter block. Note that coconut oil may make the cookie slightly crispier.
- Darker is Better: Use chocolate chunks with 70% cocoa content or higher. Higher cocoa percentages contain more flavonoids and antioxidants while reducing total sugar.
Serving Suggestions
Elevate your cookie experience with these curated pairings:
- The Classic: A tall glass of cold oat milk or dairy milk. The creaminess cuts through the density of the chocolate.
- The Sophisticate: Pair a warm cookie with a glass of Merlot or Cabernet Sauvignon. The tannins in red wine bind with the fats and proteins in the chocolate, smoothing out the wine and enhancing the cocoa.
- The Textural Contrast: Create an ice cream sandwich using salted caramel gelato. The saltiness bridges the gap between the bitter cocoa and the sweet cream.
- The Wake-Up Call: Serve alongside a shot of espresso. The hot coffee melts the chocolate chips in your mouth instantly.
Common Mistakes to Avoid
Even with the best recipe, pitfalls exist. Here is how to navigate them based on common baking data:
- Overbaking (The #1 Error):
- The Trap: Waiting until the cookie looks “done” in the center.
- The Fix: Take them out when they look slightly raw in the middle. They continue cooking on the hot tray. 30 seconds too long in the oven can be the difference between “fudgy” and “dry.”
- Using Warm Dough:
- The Trap: Skipping the chill time because you are impatient.
- The Result: Flat, greasy pancakes that merge into one giant unappealing sheet.
- Improper Flour Measurement:
- The Data: Scooping flour directly with a measuring cup packs it down, often resulting in 20% more flour than required.
- The Fix: Use the “spoon and level” method or, better yet, a kitchen scale (265g).
- Wrong Cocoa Powder:
- The Trap: Using natural cocoa (lighter color) instead of Dutch-process.
- The Result: The acidity of natural cocoa reacts differently with baking soda, potentially leading to a flatter cookie with a sharper, less chocolatey taste.
Storing Tips for the Recipe
Preserve the texture you worked so hard to achieve.
- Room Temperature: Store in an airtight container for up to 4 days.
- Pro Tip: Place a slice of white bread in the container with the cookies. The cookies are hygroscopic and will absorb moisture from the bread, keeping them soft while the bread becomes hard.
- Freezing Dough: This is the best method for fresh cookies on demand. Scoop the dough balls, freeze them on a tray for 1 hour, then transfer to a ziplock bag. They can be frozen for up to 3 months.
- To Bake: Bake directly from frozen; simply add 1-2 minutes to the baking time.
- Freezing Baked Cookies: Baked cookies can be frozen for up to 1 month. Thaw at room temperature for an hour before eating.
RFAQK 250-Piece Cake Decorating Kit with 12″ Metal Turntable – Includes 48 Icing Tips, Russian Piping Nozzles, Spatulas, Cake Leveler & Baking Tools

Conclusion
Mastering these Double Chocolate Cookies is about respecting the chemistry of baking. By controlling moisture, choosing the right cocoa, and timing your bake perfectly, you achieve a texture that is 50% cookie, 50% brownie, and 100% delicious.
Ready to become the most popular baker in your circle? Try this recipe this weekend! If you loved the results, please leave a 5-star review below or share a photo on social media tagging us. Don’t forget to subscribe to our newsletter for more science-backed baking guides!
FAQs
1. Why did my cookies come out flat?
Flat cookies are usually the result of butter that was too hot when mixed, or dough that wasn’t chilled long enough. Ensure your melted butter cools slightly before adding sugars, and never skip the 30-minute chill time.
2. Can I use baking powder instead of baking soda?
It is not recommended. Baking soda is 3-4 times stronger than baking powder and is specifically required here to react with the acidity in the brown sugar and cocoa. Using baking powder will result in a puffier, cake-like texture rather than a dense, fudgy one.
3. What is the difference between Dutch-process and Natural cocoa?
Dutch-process cocoa has been washed with a neutralizing solution (alkalized). This reduces acidity and darkens the color, giving it a smoother, earthier flavor perfect for these cookies. Natural cocoa is lighter and more acidic.
4. How do I make these cookies perfectly round?
Immediately after pulling the baking sheet from the oven, place a large round cookie cutter or a glass over a cookie and gently swirl it in a circular motion. This “scoots” the edges in while the cookie is still malleable, creating a perfect circle.
Your feedback helps other cooks succeed. Rate this recipe!
There are no reviews yet. Be the first one to write one.

Double Chocolate Cookies: 7 Secrets for Ultimate Fudginess
Ingredients
Method
Step 1: The Lipid Foundation
Preheat your oven to 350°F (175°C) and line two large baking sheets with parchment paper. In a large bowl, pour in your melted butter. Unlike creaming methods that require elbow grease, we are looking for a glossy liquid base. Whisk in the brown and white sugars vigorously for about 1-2 minutes.Step 2: Emulsification
Add the egg, the extra egg yolk, and the vanilla extract to the butter-sugar mixture. Whisk until the mixture pales slightly and looks cohesive.Step 3: The Dry Bloom
In a separate medium bowl, sift together the flour, Dutch-processed cocoa powder, baking soda, and salt. Sifting is vital here to remove cocoa lumps, which are notoriously difficult to break down later.Step 4: Gentle Integration
Pour the dry ingredients into the wet ingredients. Switch from a whisk to a rubber spatula. Mix only until streaks of flour remain.Step 5: The Chocolate Fold & Chill
Fold in your chocolate chips and chunks until just combined. Cover the bowl with plastic wrap and refrigerate for 30 minutes.Step 6: Scooping and Spacing
Scoop the dough into balls (approx. 2 tablespoons each) and place them on the baking sheets, spaced 2 inches apart.Step 7: The Precision Bake
Bake for 10-12 minutes. The centers should still look slightly underbaked and soft, while the edges are set. Remove from the oven and let them cool on the baking sheet for 5-10 Why this works: You are looking for "ribboning"—where the sugar begins to dissolve into the fat. This creates a caramel-like foundation.Chef's Tip: Ensure your eggs are at room temperature. Cold eggs can shock the melted butter, causing it to re-solidify and break the emulsion.Flavor Hack: Some bakers add a teaspoon of espresso powder here. It doesn't taste like coffee; it simply amplifies the chocolate intensity.Warning: Do not over-mix. Over-working the dough activates gluten development, which is the enemy of tender Double Chocolate Cookies.The Science: Chilling solidifies the fat. If the fat melts too fast in the oven, the cookies puddle. Chilled fat melts slowly, maintaining structure and fudginess.Aesthetic Tip: Press a few extra chocolate chips onto the top of each dough ball before baking for that Instagram-worthy bakery look.
Notes