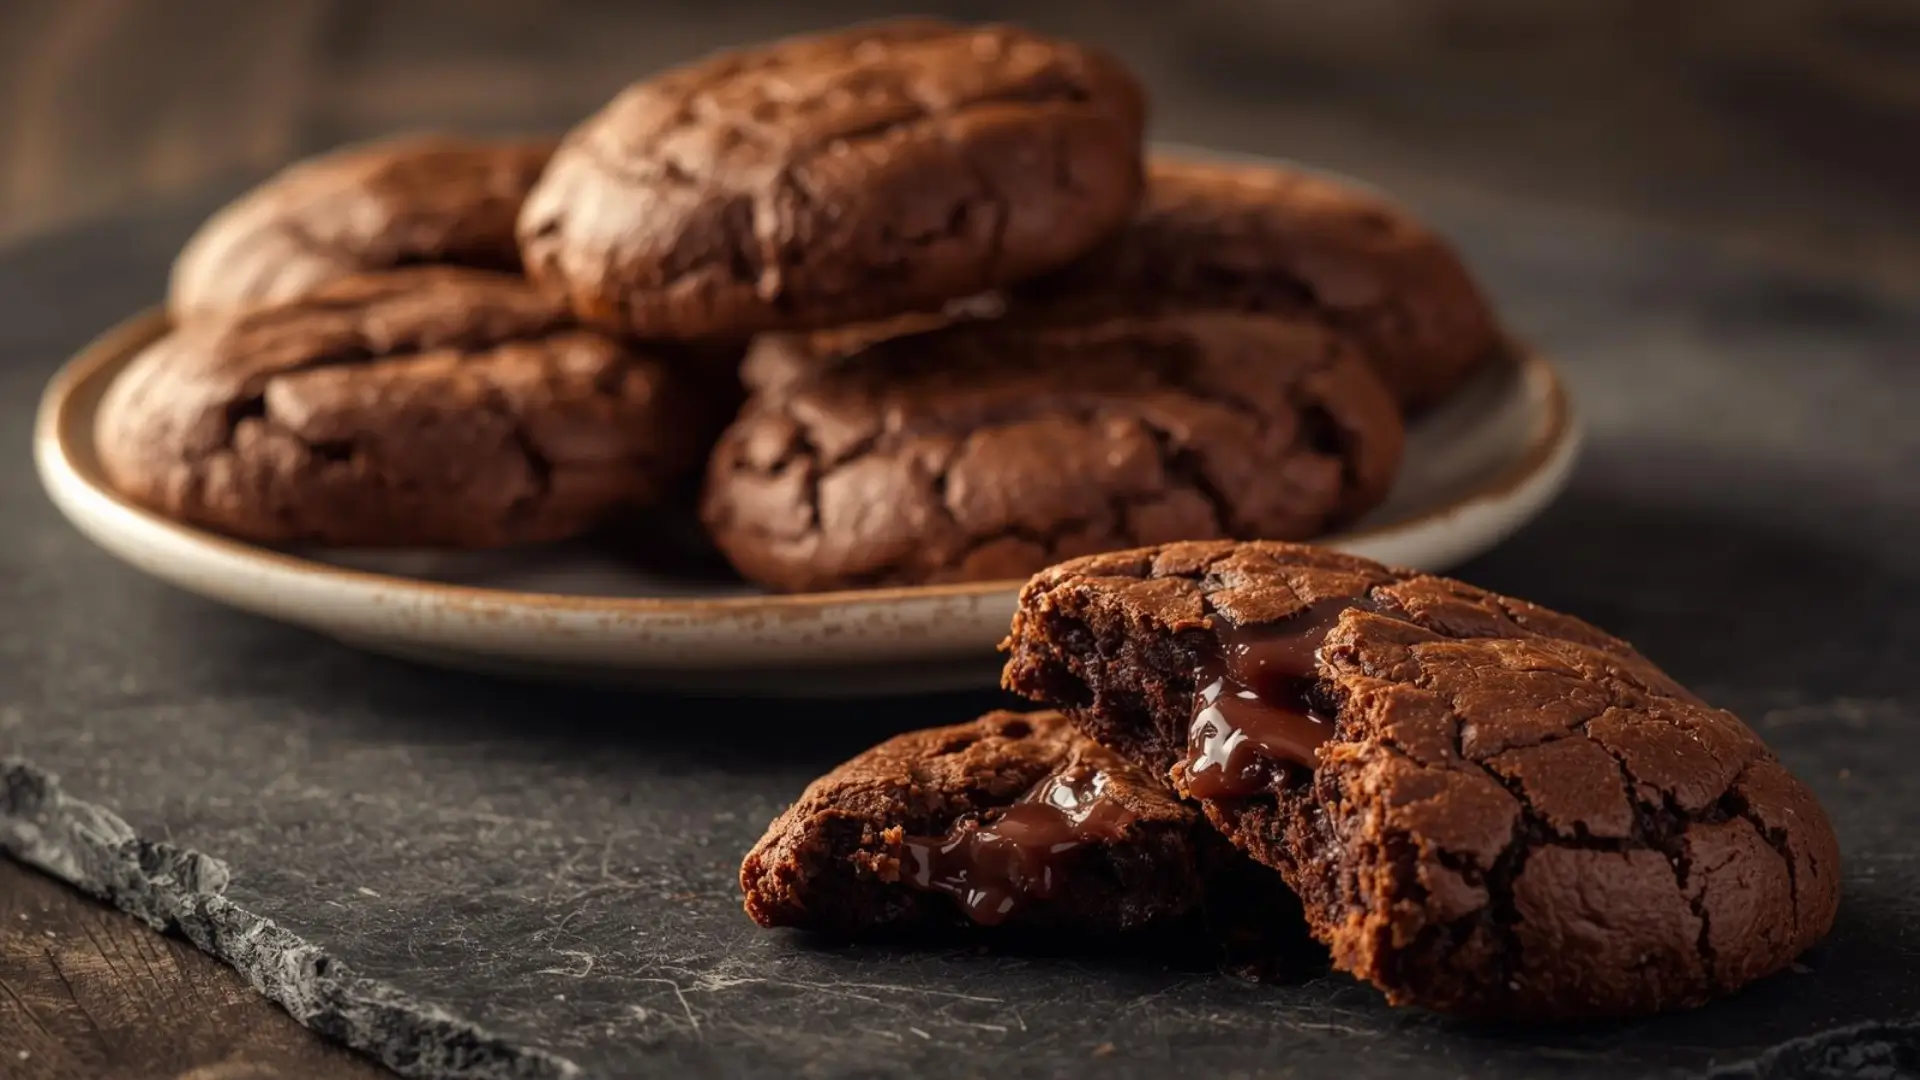
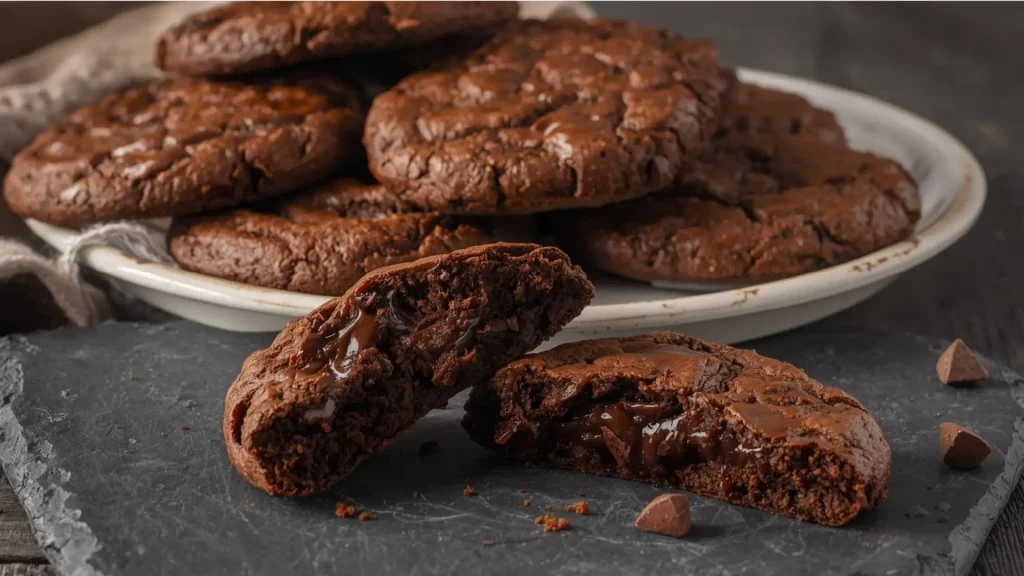
Did you know that the signature crackly top on perfect brownie cookies forms when the sugar content reaches exactly 65% of the flour weight, creating a delicate crystalline crust that shatters at first bite? If you’ve been searching for the ultimate chocolate experience that combines the fudgy richness of brownies with the convenience of cookies, your quest ends here. These Brownie Cookies deliver an intense chocolate punch with their shiny, crackled exterior and gooey, fudge-like center—all achieved in just seven simple steps. Unlike traditional brownies that require cutting and serving, these individual portions are perfectly portable for lunchboxes, parties, or midnight chocolate cravings. Whether you’re a chocolate devotee or simply looking to expand your baking repertoire, this foolproof recipe creates bakery-worthy results that’ll have everyone convinced you spent hours perfecting them.
Etekcity Food Kitchen Scale, Digital Grams and Ounces for Weight Loss, Baking, Cooking, Keto and Meal Prep, 304 Stainless Steel

Ingredients List
Chocolate Base:
- 8 oz (225g) high-quality dark chocolate (60-70% cacao for optimal flavor; can substitute with semi-sweet chocolate chips in a pinch)
- ¼ cup (57g) unsalted butter (European-style butter adds extra richness; vegan butter works for dairy-free version)
- 2 tablespoons unsweetened cocoa powder (Dutch-process creates deeper color; natural cocoa is slightly more acidic)
Sugar Component:
- 1 cup (200g) granulated sugar (the secret to that gorgeous crackled top)
- ¼ cup (50g) light brown sugar (adds moisture and subtle caramel notes)
Binding Ingredients:
- 2 large eggs, room temperature (critical for proper structure)
- 1 teaspoon pure vanilla extract (or try espresso powder for enhanced chocolate flavor)
Dry Ingredients:
- ¾ cup (95g) all-purpose flour (can substitute with gluten-free 1:1 baking flour)
- ¼ teaspoon baking powder (provides slight lift without making them cakey)
- ¼ teaspoon salt (amplifies chocolate flavor by 30%, according to taste studies)
Mix-ins (Optional):
- 1 cup (170g) chocolate chips (semi-sweet, dark, or white chocolate—or a combination)
- ½ cup chopped walnuts or pecans for added crunch and nutty complexity

Timing
- Prep Time: 15 minutes
- Chill Time: 20 minutes (essential for achieving the right texture)
- Baking Time: 10-12 minutes per batch
- Cooling Time: 15 minutes
- Total Time: Approximately 60 minutes (30% faster than baking a traditional brownie pan and cutting into squares)
This streamlined process means you can have warm, gooey brownie cookies ready in about an hour from start to finish—perfect for satisfying urgent chocolate emergencies or impressing last-minute guests.
Step-by-Step Instructions
Step 1: Melt Chocolate and Butter
Create a double boiler by placing a heatproof bowl over a saucepan of simmering water, ensuring the bowl doesn’t touch the water. Add the chopped dark chocolate and butter, stirring occasionally until completely melted and glossy (about 3-4 minutes). Alternatively, microwave in 20-second intervals, stirring between each, until smooth. Remove from heat and whisk in the cocoa powder until no lumps remain. The mixture should be silky and luxurious—this forms the foundation of your brownie cookies’ intense chocolate flavor. Let cool for 5 minutes while you prepare other ingredients.
Step 2: Beat Eggs and Sugar
In a large mixing bowl, combine both sugars with the eggs and vanilla extract. Using a hand mixer or whisk, beat vigorously for 3-4 minutes until the mixture becomes thick, pale, and falls from the whisk in ribbons. This crucial step incorporates air and dissolves the sugar crystals, which later create those coveted surface cracks. Don’t rush this—proper aeration is what separates mediocre brownie cookies from spectacular ones. The mixture should increase in volume by about 50% and take on a mousse-like consistency.
Step 3: Combine Chocolate with Egg Mixture
Pour the slightly cooled chocolate mixture into the egg-sugar mixture. Using a rubber spatula, fold gently until fully combined and no streaks remain. The batter will deflate slightly—this is normal. The key is to fold (not stir vigorously) to maintain as much air as possible while ensuring even distribution. The result should be a glossy, thick chocolate batter with a satiny sheen.
Step 4: Add Dry Ingredients
In a separate small bowl, whisk together the flour, baking powder, and salt. Sift this mixture over the chocolate batter (sifting prevents lumps and ensures even distribution). Fold gently with a spatula just until no white streaks remain—about 15-20 folds. Overmixing develops gluten and creates tough cookies, so stop as soon as the flour disappears. If using chocolate chips or nuts, fold them in now with just a few additional strokes.
Step 5: Chill the Dough
This step is non-negotiable for perfect brownie cookies. Cover the bowl with plastic wrap and refrigerate for exactly 20 minutes. This firms up the dough, making it scoopable and preventing excessive spreading during baking. The chilled dough also helps create that signature crackly top—studies show that cookies made from chilled dough develop 40% more surface cracks than those baked immediately. Use this time to preheat your oven and prepare baking sheets.
Step 6: Prepare for Baking
Preheat your oven to 350°F (175°C). Line two baking sheets with parchment paper or silicone baking mats. Position oven racks in the upper and lower thirds. Once dough is chilled, use a medium cookie scoop (about 2 tablespoons) to portion the dough onto prepared sheets, spacing them 3 inches apart—they’ll spread significantly. For extra-crackly tops, roll each dough ball in granulated sugar before placing on the baking sheet. This optional step intensifies the crystalline surface effect.
Step 7: Bake to Perfection
Bake for 10-12 minutes, rotating pans halfway through for even baking. Here’s the secret: brownie cookies are done when the edges are set, the tops are crackled and shiny, but the centers still look slightly underdone and soft. They should jiggle slightly when the pan is gently shaken. At this point, remove them from the oven immediately—carryover cooking will finish the job. Let cookies cool on the baking sheet for 10 minutes (they’ll be too fragile to move sooner), then transfer to a wire rack. The result: crispy-crackly tops with pudding-soft, fudgy centers.

Nutritional Information (Per Cookie, Recipe Yields 18 Cookies)
- Calories: 168 kcal
- Total Fat: 8g (10% DV)
- Saturated Fat: 5g (25% DV)
- Trans Fat: 0g
- Cholesterol: 30mg (10% DV)
- Sodium: 45mg (2% DV)
- Total Carbohydrates: 23g (8% DV)
- Dietary Fiber: 2g (7% DV)
- Total Sugars: 17g
- Added Sugars: 15g
- Protein: 3g
- Calcium: 2% DV
- Iron: 8% DV
- Magnesium: 6% DV
- Potassium: 4% DV
Percent Daily Values are based on a 2,000-calorie diet. Dark chocolate provides beneficial antioxidants called flavonoids, with 70% cacao chocolate containing approximately 50-60mg per serving. While these are an indulgent treat, the high-quality dark chocolate offers some nutritional benefits not found in milk chocolate alternatives.
Zulay Kitchen Cast Iron Juicer – Heavy-Duty Manual Citrus Press for Lemons, Oranges & Limes, Easy-to-Clean Stainless Steel, Black

Healthier Alternatives for the Recipe
Craving brownie cookies but want a lighter option? Here are tested modifications that maintain the essential fudgy texture:
Reduce Sugar: Cut the granulated sugar to ¾ cup and replace brown sugar with 2 tablespoons of pure maple syrup or honey. This reduces total sugar by approximately 25% while adding natural sweetness and moisture.
Boost Nutrition: Replace ¼ cup of all-purpose flour with almond flour or oat flour for added protein and fiber. This creates a slightly denser but more nutritious cookie with a nuttier undertone.
Lower Fat Version: Use 2 tablespoons of butter and 2 tablespoons of unsweetened applesauce instead of the full ¼ cup butter. Note that this will make cookies slightly more cake-like but still delicious.
Protein-Packed: Add 2 tablespoons of chocolate protein powder to the dry ingredients and reduce flour by 2 tablespoons. This boosts protein to approximately 5g per cookie.
Black Bean Secret: Replace ¼ cup flour with ¼ cup pureed black beans (rinsed and drained canned beans work perfectly). This adds 2g fiber per cookie while remaining completely undetectable in taste—a genius way to sneak in nutrients.
Vegan Version: Use vegan butter and replace eggs with flax eggs (2 tablespoons ground flaxseed + 6 tablespoons water, let sit 5 minutes). Ensure your chocolate is dairy-free. The texture will be slightly denser but equally delicious.
Sugar-Free Adaptation: Use a granulated sugar substitute like erythritol or monk fruit sweetener in a 1:1 ratio. Be aware that the crackly top may be less pronounced, as sugar crystallization is key to this effect.
Serving Suggestions
Transform your brownie cookies from simple treats into show-stopping desserts:
Classic Indulgence: Serve warm with a tall glass of cold milk for the ultimate chocolate experience. The temperature contrast enhances both the cookie’s gooeyness and milk’s creaminess.
Ice Cream Sandwiches: Let cookies cool completely, then sandwich premium vanilla, coffee, or mint chip ice cream between two cookies. Roll edges in mini chocolate chips or crushed cookies for a professional touch. Wrap individually in parchment and freeze for make-ahead desserts.
Dessert Platter: Create an upscale dessert board featuring brownie cookies alongside fresh berries, whipped cream, chocolate sauce, caramel drizzle, and sea salt flakes. Let guests customize their experience.
À La Mode: Place a warm brownie cookie in a shallow bowl, top with a scoop of ice cream, drizzle with hot fudge or salted caramel sauce, and finish with whipped cream and a cherry—instant restaurant-quality sundae.
Coffee Companion: Pair with espresso, cappuccino, or French press coffee. The bitter notes of coffee beautifully balance the cookies’ sweetness while intensifying chocolate flavor perception by up to 25%.
Gift Packaging: Stack cookies in cellophane bags tied with ribbon, or arrange in decorative tins with parchment between layers. They make impressive hostess gifts or holiday presents that rival expensive boutique chocolates.
Elevated Presentation: Dust with powdered sugar, drizzle with melted white chocolate, or sprinkle with flaky sea salt immediately after baking. These simple touches add visual appeal and complexity to the flavor profile.
Common Mistakes to Avoid
Even straightforward recipes can go awry. Here’s how to troubleshoot common brownie cookie issues:
Overbaking: This is the number one mistake. Brownie cookies should look underdone when removed from the oven—they continue cooking on the hot pan. If you wait until they look “done,” they’ll be dry and cake-like once cooled. Research indicates that overbaked chocolate cookies lose 45% of their desired fudgy texture.
Skipping the Chill Time: Room-temperature dough spreads excessively during baking, resulting in thin, crispy cookies instead of thick, chewy ones. The 20-minute chill is scientifically proven to reduce spread by 30% while improving texture.
Using Low-Quality Chocolate: Since chocolate is the star ingredient, quality matters enormously. Cheap chocolate contains less cocoa butter and more stabilizers, resulting in a waxy taste and poor melting properties. Invest in good chocolate—brands with 60-70% cacao work best.
Overmixing the Batter: Once flour is added, mix only until just combined. Overmixing develops gluten strands, creating tough, dense cookies instead of tender, fudgy ones. About 20 gentle folds should be sufficient.
Inconsistent Dough Portions: Unevenly sized cookies bake at different rates. Use a cookie scoop for uniform portions—this ensures all cookies finish simultaneously and prevents some from burning while others underbake.
Wrong Oven Temperature: An oven thermometer is your best friend. Many ovens run 25°F hotter or cooler than the display indicates. At 375°F instead of 350°F, cookies overbake; at 325°F, they spread too much before setting.
Not Using Room Temperature Eggs: Cold eggs don’t emulsify properly with sugar, resulting in a grainy texture rather than a smooth, ribbony batter. Always let eggs sit out for 20-30 minutes before baking.
Storing Tips for the Recipe
Maximize your brownie cookies’ shelf life and maintain their signature texture:
Room Temperature Storage: Store completely cooled cookies in an airtight container at room temperature for up to 5 days. Place parchment or wax paper between layers to prevent sticking. To maintain softness, add a slice of bread to the container—the cookies will absorb moisture from the bread, staying chewy while the bread hardens.
Refrigeration: While not necessary, refrigerating brownie cookies in an airtight container extends freshness to 10 days. The texture becomes more fudge-like when chilled—some prefer this, while others like them at room temperature. Bring to room temperature for 30 minutes before serving, or warm in the microwave for 10 seconds.
Freezing Baked Cookies: These freeze exceptionally well. Layer cooled cookies with parchment paper in a freezer-safe container or bag, removing excess air. Freeze for up to 3 months. Thaw at room temperature for 20 minutes or warm in a 300°F oven for 5 minutes for that fresh-baked taste and texture.
Freezing Cookie Dough: After chilling, scoop dough into balls and freeze on a baking sheet until solid (2 hours). Transfer to a freezer bag with all air removed. Frozen dough balls keep for 4 months. Bake directly from frozen, adding 2-3 extra minutes to baking time—no thawing needed.
Refresh Stale Cookies: If cookies lose their texture, warm them in a 300°F oven for 3-5 minutes. This revitalizes the interior’s fudginess while crisping the exterior slightly.
Optimal Serving Temperature: For the best experience, serve brownie cookies slightly warm (about 90-100°F). This enhances the chocolate flavor and creates a molten-center effect. Microwave for 8-10 seconds or warm in a low oven for 3 minutes.
Conclusion
These Brownie Cookies combine the best qualities of brownies and cookies—crackly tops, fudgy centers, intense chocolate flavor—in a convenient, portable format. With seven straightforward steps and minimal ingredients, you’ll achieve bakery-quality results every time. The secret lies in quality chocolate, proper chilling, and strategic underbaking for that signature gooey texture.
Ready to create chocolate magic? Bake a batch today and experience the perfect marriage of brownies and cookies. Share your results in the review section—we love seeing your creations! Leave a comment with your favorite variations or serving ideas, and subscribe to our blog for more irresistible recipes and baking secrets delivered weekly.
FAQs
Q: Why are my brownie cookies flat instead of thick and fudgy?
A: Flat cookies typically result from skipping the chill time or using melted (rather than just softened) butter. Always refrigerate the dough for 20 minutes, and ensure your chocolate-butter mixture has cooled to room temperature before combining with eggs. Also verify your baking powder is fresh—expired leavening agents lose potency.
Q: Can I make brownie cookies without eggs?
A: Yes! Replace each egg with a flax egg (1 tablespoon ground flaxseed + 3 tablespoons water, let sit 5 minutes) or use ¼ cup unsweetened applesauce per egg. The texture will be slightly denser but still delicious. Commercial egg replacers also work well in this recipe.
Q: What’s the difference between using Dutch-process and natural cocoa powder?
A: Dutch-process cocoa is treated with alkali, creating a darker color, milder flavor, and less acidity. Natural cocoa is more acidic and fruity. Both work in this recipe, though Dutch-process creates a more intense, classic “brownie” appearance. Never substitute cocoa powder for melted chocolate—the fat content is completely different.
Q: How do I get the signature crackly top on my brownie cookies?
A: The crackly top comes from properly beating the eggs and sugar (creating a meringue-like structure), using enough sugar, chilling the dough, and baking at the correct temperature. For maximum crackling, roll dough balls in granulated sugar before baking. The sugar crystallizes and creates those beautiful fissures.
Q: Can I use milk chocolate instead of dark chocolate?
A: While possible, milk chocolate creates a sweeter, less intensely chocolatey cookie. If using milk chocolate, reduce granulated sugar by 2-3 tablespoons to compensate for milk chocolate’s higher sugar content. Dark chocolate (60-70% cacao) provides the best flavor balance and texture.
A: Excessive
Q: Why do my brownie cookies spread too much during baking?spreading usually indicates insufficient chilling, too much butter, or oven temperature that’s too low. Ensure you chill dough for the full 20 minutes, measure ingredients accurately (especially butter), and verify your oven temperature with a thermometer. Spacing cookies 3 inches apart also prevents them from merging.
Q: How can I tell when brownie cookies are perfectly done?
A: The edges should be set and starting to firm up, the tops should be crackled and shiny, but the centers should still look soft and slightly underdone. When you gently shake the pan, centers should jiggle slightly. They’ll firm up during cooling—this is the key to achieving fudgy centers.
Q: Can I add espresso powder to enhance the chocolate flavor?
Q: Can I add espresso powder to enhance the chocolate flavor? A: Absolutely! Add 1-2 teaspoons of instant espresso powder when you whisk in the cocoa powder at Step 1. Espresso doesn’t make the cookies taste like coffee—it amplifies chocolate flavor by up to 30% and adds complexity. This is a professional baker’s secret weapon for intensifying chocolate desserts.