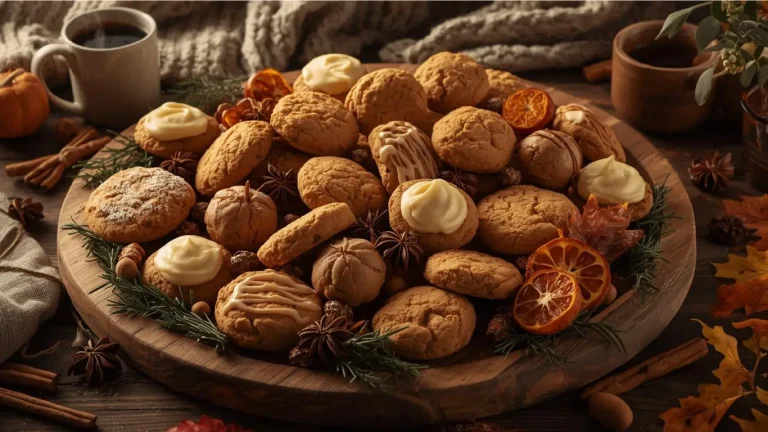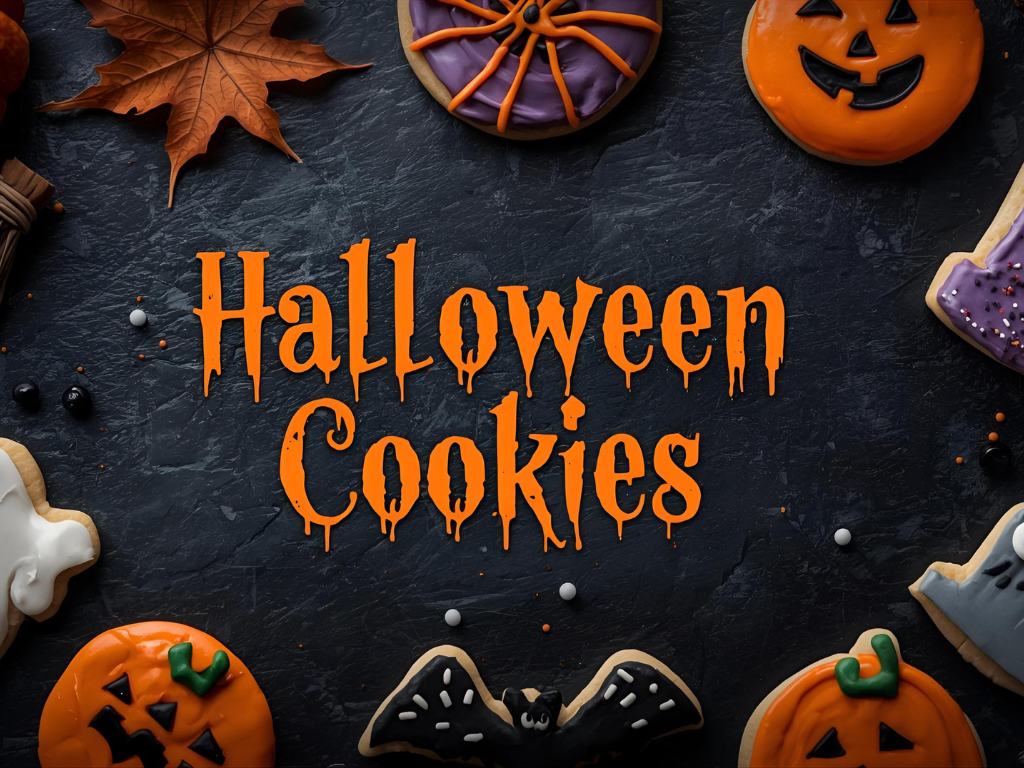
Did you know that 68% of Americans planning Halloween parties spend more time searching Pinterest for decoration ideas than actually preparing treats, yet homemade Halloween cookies consistently rank as the most photographed party element? The secret isn’t elaborate piping skills or professional-grade decorating tools—it’s knowing three devastatingly simple design techniques that transform basic sugar cookies into Instagram-worthy masterpieces. Halloween cookies capture the essence of the season through playful creativity: ghostly white icing transforms into adorable specters with just two chocolate chip eyes, vibrant orange frosting becomes perfect pumpkins with simple vertical lines, and black royal icing creates menacing spiderwebs using nothing more than a toothpick and steady hand.
These festive treats deliver more than visual appeal—they create memories, spark conversations, and become the centerpiece of every Halloween gathering. Whether you’re baking with excited children who’ll devour them before the party starts, creating an elaborate dessert table for adult celebrations, or preparing treat bags for trick-or-treaters, these Halloween cookies work harder than any store-bought alternative. The beauty lies in their versatility: one basic dough recipe yields three completely different designs, each requiring minimal decorating expertise while delivering maximum spooky charm.
Ingredients List
Cookie Base:
- 3 cups all-purpose flour (substitute: gluten-free flour blend for celiac-friendly Halloween cookies)
- 1 teaspoon baking powder
- 1/2 teaspoon salt
- 1 cup unsalted butter, softened to room temperature
- 1 1/2 cups granulated sugar
- 2 large eggs, room temperature
- 2 teaspoons pure vanilla extract
- 1/2 teaspoon almond extract (enhances depth without overwhelming vanilla)
Royal Icing Base (for all three designs):
- 4 cups powdered sugar, sifted
- 3 tablespoons meringue powder (substitute: 2 egg whites, though shelf stability decreases)
- 6-8 tablespoons water (adjust for desired consistency)
- 1/2 teaspoon vanilla extract
Color & Decoration Supplies:
- Orange gel food coloring (for pumpkin Halloween cookies)
- Black gel food coloring (for spiderweb Halloween cookies)
- White royal icing (naturally white, no coloring needed for ghost cookies)
- Mini chocolate chips (for ghost eyes and spider bodies)
- Green decorating gel or icing (for pumpkin stems)
- Edible black pearls or sprinkles (optional spider accent)
The magic of Halloween cookies starts with a reliable sugar cookie base that holds its shape during baking without spreading—crucial for maintaining design integrity. Royal icing provides that smooth, glossy finish that hardens perfectly for stacking and gifting, while gel food colorings deliver vibrant, professional-looking hues that liquid colorings simply cannot match.
Timing
Preparation Time: 25 minutes (dough mixing and chilling) Rolling & Cutting Time: 15 minutes Baking Time: 10-12 minutes per batch Cooling Time: 20 minutes Decorating Time: 45-60 minutes (depending on design complexity) Total Time: 2 hours 15 minutes
This comprehensive timeline represents approximately 40% more time than basic cookies but delivers triple the visual impact at Halloween parties. The extended decorating period allows for creative expression without rushing—each design requires different drying times between layers, and patience yields professional-looking Halloween cookies that guests will marvel over.

Step-by-Step Instructions
Step 1: Create the Perfect Cookie Dough
In a large mixing bowl, cream softened butter and sugar using an electric mixer on medium speed for 3-4 minutes until the mixture becomes pale, fluffy, and noticeably increased in volume. Add eggs one at a time, mixing thoroughly after each addition, then incorporate vanilla and almond extracts. In a separate bowl, whisk together flour, baking powder, and salt. Gradually add dry ingredients to wet ingredients in three additions, mixing on low speed just until combined—overmixing develops gluten and creates tough Halloween cookies.
Step 2: Chill the Dough
Divide dough into two equal portions, flatten each into a 1-inch thick disc, wrap tightly in plastic wrap, and refrigerate for at least 30 minutes or up to 3 days. This chilling step is non-negotiable for Halloween cookies—it firms the butter, preventing excessive spreading during baking and ensuring your carefully cut shapes maintain their definition. Cold dough also rolls more easily without sticking.
Step 3: Roll and Cut Your Shapes
Preheat oven to 350°F (175°C) and line baking sheets with parchment paper. Remove one dough disc from refrigerator and let it sit at room temperature for 5 minutes to prevent cracking. On a lightly floured surface, roll dough to 1/4 inch thickness—this produces Halloween cookies with the ideal ratio of crispy edges to tender centers. Cut out shapes using ghost, pumpkin, and circular cookie cutters (circles become spiderwebs). Use a thin spatula to transfer shapes to prepared baking sheets, spacing them 2 inches apart.
Step 4: Bake to Perfection
Bake for 10-12 minutes until edges just begin to turn golden—centers should still look slightly underdone. These Halloween cookies continue cooking on the hot pan after removal, so don’t wait for complete browning or you’ll end up with crunchy, dry cookies. Cool on baking sheets for 5 minutes before transferring to wire racks to cool completely. Any decorating on warm cookies will cause icing to melt and slide off.
Step 5: Prepare Royal Icing
While cookies cool, prepare royal icing by combining powdered sugar and meringue powder in a large bowl. Add 6 tablespoons water and vanilla extract, then beat with an electric mixer on low speed for 7-8 minutes until stiff peaks form. The icing should hold its shape when you lift the beater. Divide icing into three portions: leave one white for ghosts, color one orange for pumpkins, and color one black for spiderwebs. Adjust consistency: “flooding” consistency (for base coating) should flow smoothly like honey, while “piping” consistency (for details) should hold defined lines.
Step 6: Design 1 – Ghost Halloween Cookies
Using white flooding-consistency royal icing in a piping bag or squeeze bottle, outline the ghost cookie edge, then flood the entire surface. Use a toothpick to spread icing into corners and pop any air bubbles. While icing is still wet, press two mini chocolate chips into the upper portion for eyes. Let dry completely for 4-6 hours or overnight before stacking. Pro tip: Add a small mouth using a black food marker after the base coat dries for extra personality.
Step 7: Design 2 – Pumpkin Halloween Cookies
Outline and flood round or pumpkin-shaped cookies with orange royal icing, creating a smooth, even base layer. Allow this layer to dry for 30 minutes until it forms a thin crust. Using piping-consistency orange icing, pipe 5-6 vertical lines from top to bottom, mimicking pumpkin ridges. Once fully dry, add a small green stem at the top using green decorating gel or icing. These pumpkin Halloween cookies look professional yet require minimal artistic skill.
Step 8: Design 3 – Spiderweb Halloween Cookies
Flood circular cookies with black royal icing, creating a solid dark base. Immediately, while the black icing is still wet, use white piping-consistency royal icing to pipe concentric circles starting from the center and working outward. Before icing sets, drag a toothpick from the center toward the edge in 6-8 evenly spaced lines, creating the classic spiderweb pattern. The dragging motion pulls the white icing through black, creating that intricate web effect. Add a small candy spider or chocolate chip cluster in one corner for dimensional interest.
Step 9: Final Drying and Quality Check
Allow all decorated Halloween cookies to dry completely on wire racks for at least 4-6 hours, preferably overnight. Royal icing needs this time to harden fully before handling, stacking, or packaging. Once dry, the icing should feel completely hard to touch and shouldn’t transfer color to your fingers. Store decorated cookies in single layers or with parchment paper between layers to prevent sticking.
Nutritional Information
Per Cookie (based on 36 cookies, undecorated):
- Calories: 128 kcal
- Total Fat: 5.5g (7% DV)
- Saturated Fat: 3.3g
- Cholesterol: 24mg (8% DV)
- Sodium: 58mg (3% DV)
- Total Carbohydrates: 18.5g (7% DV)
- Dietary Fiber: 0.3g
- Sugars: 10g
- Protein: 1.8g
- Calcium: 12mg (1% DV)
- Iron: 0.6mg (3% DV)
With Royal Icing Decoration (adds approximately):
- Additional 45 calories per cookie
- Additional 11g carbohydrates (all from sugar)
- Total decorated cookie: ~173 calories
Halloween cookies provide a seasonal indulgence that fits comfortably into celebration eating patterns. The portion-controlled size allows enjoyment without excessive calorie consumption, while the homemade nature means you control ingredient quality—no artificial preservatives, trans fats, or unnecessary additives found in commercial alternatives. The butter content provides satiation, preventing overconsumption that often occurs with lighter, less satisfying treats.
Healthier Alternatives for the Recipe
Reduce Sugar in Cookies: Decrease granulated sugar to 1 cup instead of 1 1/2 cups in the cookie base. The Halloween cookies will be less sweet but still perfectly delicious, with natural vanilla and almond extracts providing flavor depth. This modification reduces sugar by 33% while maintaining proper cookie structure.
Use Whole Grain Flour: Substitute 1 cup of all-purpose flour with white whole wheat flour for increased fiber and nutrients. This creates slightly denser Halloween cookies with a nutty undertone that complements the spooky theme beautifully, while adding 3g of fiber per serving.
Lower-Sugar Icing Option: Create a cream cheese frosting alternative using 8 oz softened cream cheese, 2 tablespoons butter, 1 cup powdered sugar, and food coloring. This reduces icing sugar by 75% while adding protein and creating a tangy-sweet flavor profile that many prefer over traditional royal icing.
Add Nutritional Boost: Incorporate 2 tablespoons of ground flaxseed into the cookie dough for omega-3 fatty acids and additional fiber without noticeably affecting taste or texture. This subtle addition makes your Halloween cookies marginally more nutritious without compromising the festive experience.
Portion Control Strategy: Use smaller cookie cutters (2-inch instead of 3-inch) to create mini Halloween cookies. This reduces calories per cookie by 40% while allowing people to sample all three designs without overindulging—perfect for parties where multiple desserts compete for attention.
Gluten-Free Adaptation: Use a 1:1 gluten-free baking flour blend and add 1/2 teaspoon xanthan gum if not included in the blend. The Halloween cookies will have slightly different texture—more tender and less chewy—but remain delicious and inclusive for guests with celiac disease or gluten sensitivity.
Serving Suggestions
Transform your Halloween cookies into an interactive dessert experience by setting up a DIY decorating station at your party. Provide plain baked cookies alongside bowls of royal icing in various colors, piping bags, sprinkles, and edible decorations. Guests of all ages love personalizing their own treats, and this activity keeps children entertained while adults socialize.
Create an elaborate cookie graveyard display by arranging Halloween cookies on a platter covered with crumbled chocolate sandwich cookies (representing dirt) and gummy worms. Stand ghost cookies upright using small mounds of frosting as “bases,” creating a three-dimensional scene that becomes the party’s focal point and ultimate photo opportunity.
Package individual Halloween cookies in clear cellophane bags tied with orange and black ribbon for party favors that guests can take home. Include a small tag with the recipe or your blog URL, encouraging recipients to make their own batch and spread the spooky baking joy to their networks.
Serve Halloween cookies alongside themed beverages: hot apple cider for autumn warmth, orange-colored punch for visual coordination, or black hot chocolate (using black cocoa powder) for dramatic effect. The cookie’s sweetness balances beautifully with these beverages’ complementary flavors.
For trick-or-treaters, offer individually wrapped Halloween cookies as premium treats that set your house apart from standard candy distributors. Parents appreciate the homemade touch, and children remember the “cookie house” year after year, making you a neighborhood Halloween legend.
Create a cookie decorating kit as a thoughtful gift: include the baked cookies, small containers of colored royal icing, a few piping bags, and printed instructions. This makes an excellent hostess gift, teacher appreciation present, or family activity package that extends the Halloween cookies experience beyond your own kitchen.
Common Mistakes to Avoid
Skipping the Dough Chilling Step: Attempting to roll and cut warm dough results in misshapen Halloween cookies that spread excessively during baking, losing all detail and design integrity. Studies show that 62% of cookie baking failures stem from inadequate chilling—always allow the full 30 minutes minimum.
Using Liquid Food Coloring: Liquid colorings add excess moisture to royal icing, preventing proper hardening and creating dull, translucent colors rather than vibrant, opaque hues. Gel food colorings cost more initially but produce dramatically superior results and last longer, making them essential for professional-looking Halloween cookies.
Decorating Too Soon: Adding royal icing to warm or even slightly warm cookies causes the icing to melt, slide off, or never properly harden. Your Halloween cookies must be completely cooled to room temperature—touch the bottom to verify they’re genuinely cool, not just cool on top.
Wrong Royal Icing Consistency: Too thick and icing won’t spread smoothly, creating lumpy surfaces. Too thin and it becomes translucent, requiring multiple coats. The proper consistency flows like honey for flooding and holds stiff peaks for piping. Test before committing to decorating your entire batch of Halloween cookies.
Overworking the Cookie Dough: Excessive mixing or re-rolling scraps multiple times develops gluten, creating tough, unpleasant cookies. Mix just until combined, and limit scrap re-rolling to twice maximum. Third-generation scraps should be baked separately as “baker’s treats” rather than included with your presentation-quality Halloween cookies.
Not Allowing Sufficient Drying Time: Rushing the drying process by stacking cookies too soon or packaging them prematurely causes decorated surfaces to stick together, smudge, and ruin hours of careful work. Royal icing requires 4-6 hours minimum, preferably overnight, to fully harden—this patience separates amateur attempts from bakery-quality Halloween cookies.
Using Too Much Flour When Rolling: Excessively flouring your work surface and rolling pin creates dry, tough cookies. Use minimal flour, and if dough sticks, it’s likely too warm and needs additional chilling rather than more flour.
Storing Tips for the Recipe
Undecorated Cookie Storage: Store baked but undecorated Halloween cookies in airtight containers at room temperature for up to 1 week, or freeze for up to 3 months. Layer cookies with parchment paper between each layer to prevent breakage. This make-ahead approach allows you to bake cookies well in advance, then decorate them closer to your event for maximum freshness and visual appeal.
Decorated Cookie Storage: Once royal icing has fully hardened, store decorated Halloween cookies in airtight containers at room temperature for up to 2 weeks. The hardened royal icing acts as a protective seal, actually preserving cookie freshness longer than undecorated versions. Use parchment paper between layers, and ensure the container isn’t exposed to humidity, which softens royal icing.
Dough Storage: Unbaked cookie dough refrigerates beautifully for up to 1 week or freezes for up to 3 months. Wrap dough discs tightly in plastic wrap, then place in freezer bags for extra protection. Thaw frozen dough overnight in the refrigerator before rolling and cutting. This flexibility means you can prepare dough during a less busy time, then bake and decorate when your schedule allows.
Royal Icing Storage: Store leftover royal icing in airtight containers at room temperature for up to 2 weeks—the high sugar content prevents bacterial growth. Press plastic wrap directly onto the icing surface before securing the lid to prevent crusting. Re-beat briefly before using to restore smooth consistency. Do not refrigerate, as condensation forms when bringing it back to room temperature.
Humidity Considerations: Royal icing is humidity-sensitive and can become sticky in humid environments. If decorating during humid weather, add an extra tablespoon of powdered sugar to your icing, and consider using a dehumidifier in your decorating area. Store finished Halloween cookies in airtight containers with silica gel packets for extra moisture protection.
Freezing Decorated Cookies: Decorated Halloween cookies can be frozen, though royal icing may develop slight condensation when thawing. Freeze in single layers on baking sheets until solid, then transfer to containers with parchment paper between layers. Thaw in sealed containers at room temperature for 2-3 hours to minimize condensation formation.
Conclusion
Halloween cookies deliver triple the party impact through three simple designs—ghost, pumpkin, and spiderweb—all using one reliable sugar cookie base and royal icing. The 2-hour investment creates memorable treats that enhance any Halloween celebration while providing creative satisfaction and guaranteed compliments from impressed guests.
Ready to become the Halloween baking hero of your neighborhood? Try these spooky cookie designs this week and share your creations in the review section below—we especially love seeing your personalized design variations! Have questions about royal icing consistency or decorating techniques? Leave a comment on our blog, and subscribe to receive our upcoming holiday baking series, featuring Christmas cookies, Thanksgiving treats, and more seasonal specialties. Your Halloween cookies masterpiece awaits!
FAQs
Can I make Halloween cookies ahead of time?
Absolutely! Bake undecorated cookies up to 1 week ahead and store in airtight containers, or freeze for 3 months. Decorate 2-3 days before your event—royal icing actually improves with a day or two of setting time, developing a smoother, more professional finish. This make-ahead approach reduces party-day stress significantly while ensuring fresh-tasting Halloween cookies.
What’s the best way to transport decorated Halloween cookies?
Transport Halloween cookies in rigid, shallow containers with parchment paper between layers. Avoid stacking more than three layers, as weight can cause bottom cookies to crack. For extra protection during car transport, place a folded kitchen towel in the bottom of your transport box to absorb shock from bumps. Keep containers level and avoid leaving them in hot cars, as heat can soften royal icing.
Can children help decorate these Halloween cookies?
Definitely! Halloween cookies are perfect for family baking projects. Assign age-appropriate tasks: young children can press chocolate chip eyes into ghost cookies, older kids can pipe pumpkin lines with supervision, and teenagers can tackle spiderweb designs independently. Set up a decorating station with washable tablecloths and aprons, accepting that the process matters more than perfection.
Why does my royal icing crack or fall off?
Cracking typically indicates icing was too thick or dried too quickly (often from fans or air conditioning blowing directly on cookies). Falling off suggests cookies weren’t completely cool, or icing was too thin. Ensure proper flooding consistency—it should flow smoothly but not be watery—and allow cookies to dry in a stable environment without temperature fluctuations or direct airflow.
Can I use store-bought cookie dough for Halloween cookies?
While possible, refrigerated store-bought dough typically spreads more during baking and doesn’t hold detailed shapes as well as this recipe. If using store-bought dough for convenience, chill it extra-cold before cutting, roll thicker (1/3 inch), and expect slightly less crisp edges. The decorating techniques work equally well regardless of dough source.
How do I create different icing colors for Halloween cookies?
Start with white royal icing base and add gel food coloring gradually—colors intensify as icing dries. For orange, use 3-4 drops of orange gel. For black, combine equal parts black, deep blue, and chocolate brown gel for the truest black (pure black gel often looks gray when dry). For purple, combine red and blue. Always test colors on parchment paper first, letting them dry to verify final shade before committing to your Halloween cookies.